- Building a 3D Digital Clock with ArduinoPosted 4 months ago
- Creating a controller for Minecraft with realistic body movements using ArduinoPosted 5 months ago
- Snowflake with ArduinoPosted 5 months ago
- Holographic Christmas TreePosted 5 months ago
- Segstick: Build Your Own Self-Balancing Vehicle in Just 2 Days with ArduinoPosted 6 months ago
- ZSWatch: An Open-Source Smartwatch Project Based on the Zephyr Operating SystemPosted 7 months ago
- What is IoT and which devices to usePosted 7 months ago
- Maker Faire Rome Unveils Thrilling “Padel Smash Future” Pavilion for Sports EnthusiastsPosted 7 months ago
- Make your curtains smartPosted 7 months ago
- Configuring an ESP8266 for Battery PowerPosted 8 months ago
WiFi Christmas Tree
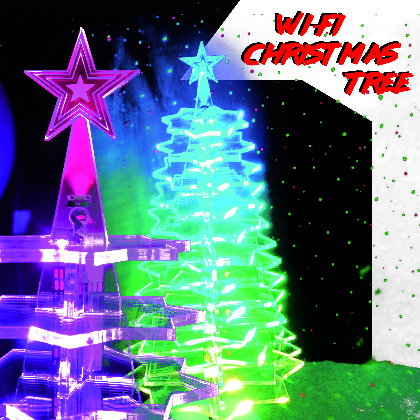
Made of interlocking plexiglass, it is illuminated by a Neopixel strip operated by Fishino Guppy that we control with a smartphone via a Telegram bot.
This year the Christmas tree lights are controlled with Telegram!
In this slogan, we could summarize the project described in these pages, which like every year is on a Christmas theme but this year is something particularly technological: it is a Christmas tree in transparent plexiglass with luminous games and music that can be controlled by a smartphone.
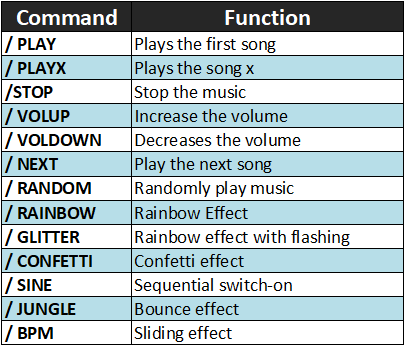
The electronics include four Neopixel LED strips controlled by the small Fishino Guppy board, equipped with Wi-Fi and therefore perfect for managing the luminous animations and the music of the tree using a smartphone. More precisely, the control is not direct but takes place via Telegram, the app for instant messaging that contends notoriety WhatsApp, but it offers, despite being less known by the general public, interesting Functions for bots: with a bot we command the Neopixel strips and the music of the luminous tree through the smartphone and in these pages we will explain how we will do it. Before proceeding we will focus on the choice of transparent plexiglass as a tree structure, which is not accidental but it derives from the ability that this material has, like glass, to be transversally crossed by light; this allows us to create a structure made up of two fir-shaped silhouettes to cross, along which four LED strips and transverse planes run, stuck perpendicular to the shapes and which will propagate the light that the Neopixel LEDs radiate from the inside. Everything rests on a 3D printed base with transparent PLA, which also acts as a container for electronics.
THE ELECTRONICS
The brain of the Wi-Fi Christmas tree is a Fishino Guppy board. On the PCB there is also an MP3 player and connectors to conveniently connect the Neopixel strips.
Everything is powered by a common AC / DC power supply with stabilized voltage 5V 2A output.
Everything must be connected according to the wiring diagram found in these pages.
WIRING PLAN
Let’s take a look at the plan, in which we distinguish the Fishino Guppy, signed U2 (cod. GUPPY) and the MP3 player with microSD, called U1 (cod. DFR0299); of Guppy we use only four digital I / O pins, namely:
- D5 to send the command strings to the Neopixel strips, which will be connected in parallel through the OUT1, OUT2, OUT3 and OUT4 connectors, on which the data line to be connected to the DI (Data Input) contact of the strips is multiplexed (the power supply is shown in parallel on the four connectors);
- D2, which receives data from the MP3 module through its TX contact (pin 3) through the resistance R1;
- D3, which sends commands to the MP3 module on its RX pin (2) using the R2 resistor;
- D6, which controls the BUSY line (pin 16) of the MP3 module.

D2 and D3 constitute the serial interface that allows Fishino Guppy to control the MP3 module at 9,600 baud and the resistances have been inserted to “adapt” the logic levels of the Guppy to those of the reader.
The NeoPixel strips are managed in parallel with a single microcontroller line of our Fishino, set in the sketch; communication is unidirectional.
NeoPixel is a particular “intelligent” RGB LED solution where each NeoPixel LED has an onboard controller, controlled by Fishino through the dedicated FastLed library.
Each RGB LED can be controlled individually via a dedicated command inserted into the string to the series and can produce up to 256 shades of their colour, resulting in a total of 16,777,216 colour combinations.
A special feature of NeoPixel LEDs is that they can be connected in cascade so that the data line goes from one to the next.
For each strip of LED, it is possible to set the refresh rate as desired, so as to make certain plays of light imperceptible, without prejudice to the limit dictated by the number of strips connected. In our case, we use 3 strips of 12 LEDs each and a strip of 13 LEDs. The longer strip uses the last one on the LED to illuminate the star positioned on the top of the tree. The strips are obtained starting from a strip of 150 LEDs on 5m available on open electronics with the code STRIP150LED (obviously the portion of advanced strip can be used for other projects or for other trees).
The entire circuit is powered through a DC jack from which the DC voltage applied by the power supply reaches the 5V line through the protection diodes D1, D2 and D3, connected in parallel to distribute the current and thus present the minimum possible voltage drop.
On the cathode of the diodes, we have placed a battery of filter capacitors (C1, C2, C3 and C4) useful for further levelling the continuous voltage before sending it to Fishino Guppy and to the MP3 module: C1 and C3 filter any impulsive disturbances (they are very useful if we power the circuit with a switching power supply) and C2-C4 act as further levelling and suppression of the ripple of a possible mains power supply with transformer and capacitive filter.
The Fishino Guppy is fed through the + 5V pin and the GND pins.
As for the MP3 module, in the diagram it makes available both the audio outputs available, that is the one for the speaker (in this case it is MONO) which must be connected between the SPK1 and SPK2 contacts, in addition to the low level one, to be amplified with a device external or to be sent to the input of a mixer, a recorder or similar, stereo and located at pins 4 and 5 (referring to ground).
Components List:
R1: 1 kohm
R2: 1 kohm
C1: 100 nF ceramic
C2: 470 µF 16 VL electrolytic
C3: 100 nF ceramic
C4: 470 µF 16 VL electrolytic
U1: MP3 module DFR0299
U2: Guppy
D1: 1N4007
D2. 1N4007
D3: 1N4007
AMP: 3.5mm jack connector from CS
Various:
- Plug power supply
-
2-way steering wheel wire-to-board socket
-
3-way steering wheel wire-to-board socket
(4 pcs.)
- 2-way wire to board connector from PCB
-
3-way wire to board connector from PCB
(4 pcs.)
- 8-way female strip (2 pcs.)
-
15-way female strip (2 pcs.)
-
Printed circuit S1422
(102×53 mm)
THE MP3 PLAYER
The component we use for audio reproduction allows us to reproduce MP3 music tracks from the base of the tree without having to use expensive and demanding hardware: in fact, the
DFR0299 (U1 in the diagram) is a complete decoder that draws on an SD-Card support (microSD, to be exact), deciphers the audio and then amplifies it on-board ready to send it to a loudspeaker (8-ohm impedance) with almost 3 watts of power, supplied by a small mono internal BF final, with bridge output stage. Since the MP3 decoder of the module is stereo, in reality there are two audio outputs available, i.e. one per channel, but they are accessible from the outside only at a relatively high low level and impedance, made to drive amplifiers, mixer inputs, 300 headphones ohms etc. They are accessible from pins 4 (DACR, right channel) and 5 (DACL, left channel). The built-in power amplifier, on the other hand, is mono and amplifies the mixing of the right and left channels). The built-in power amplifier, on the other hand, is mono and amplifies the mixing of the right and left channels.
The module was created to be managed by Arduino, which in effect simply sends commands in serial format (9,600 baud) to manage reproduction; in our case, it is managed by the Fishino Guppy card; the rest is done by the decoder chip inside the module.
The DFR0299 player can be used in stand-alone mode, powering it at 5 volts (the current required to deliver 3 watts on 8 ohms, which are obtained at 5 volts, is 0.45 amperes), connecting a speaker and buttons, or can be used in combination with a microcontroller equipped with a TTL serial port.
The MP3 music tracks to be played must be contained in a microSD and the decoder supports up to 100 folders, each of which can contain up to 255 MP3 tracks. In our case, we have created an MP3 folder where we have copied up to 9 songs called 0001.mp3, 0002.mp3, etc.
The volume adjustment includes 30 levels. The expected supply is from 3.2V to 5V in continuous (the current absorbed in standby is only 20 mA).
The main features of the module are:
- decoding MP3 11172-3 and ISO13813-3 layer3 audio decoding;
- possibility of Pop, Rock, Jazz, Classical equalization;
- sampling frequencies in reproduction (kHz): 8 / 11.025 / 12/16 / 22.05 / 24/32 / 44.1 / 48
- 24-bit DAC, which supports a dynamic range of 90 dB and a signal-to-noise ratio of 85dB;
- FAT16 and FAT32 file system support;
- maximum addressable memory capacity of 32 GB, 32G of USB disk, 64 MB Flash NOR blocks.
For the management of the module a clearly specific library has been developed which includes our sketch, which allows you to decide which file to play, adjust volume and so on.
From Telegram you can order the module to play a specific song, with the playx command in which instead of x goes the number of the MP3 file stored on the card (from 1 to 9); you can also set the listening volume, raising it with the volup command or lowering it with voldown.
All the controls, like those for lighting effects, are texts to be sent via Telegram.
THE REMOTE CONTROL
As mentioned, Fishino Guppy connects via Wi-Fi to the router that overlooks it on the Internet and from here it communicates with the Telegram servers through an artfully crafted bot; the bot is created with web services like BotFather and resides in Fishino.
But let’s take a step back and explain, to those who do not know, what a Telegram bot is: it is a virtual user, not associated (or not necessarily associated) with a phone number, as is instead necessary if you want create a Whatsapp account. The peculiarity is that it is a software robot (hence the name bot, which is the abbreviation) that interacts with other users almost as if it were a real user and allows us to create some automation. In our case, the bot sends the commands to Fishino Guppy that we, through our Telegram user account, transmit from the smartphone in the form of text messages and receive status replies (on the execution of the commands) and requests to be sent, always through text messages of Telegram. In short, the bot is like a person to whom we write what our luminous Wi-Fi tree must do and that interacts with Fishino Guppy, also informing us about the activity of the tree itself. When we turn on the tree for the first time, Fishino looks for the Wi-Fi connection (in the sketch we have to enter the SSID and the password of our network) and if it doesn’t find it, it launches the fading lighting, which is the default animation; when it connects to Wi-Fi, instead, it executes what we send it from a smartphone. Each time it is turned on it executes the last light animation that was set remotely last. In addition to the lights, if we order it from Telegram it also turns on the MP3 player and executes the song corresponding to the request.
The Fishgram library
To manage Fishino Guppy from Telegram we used a special library called Fishgram, which allows management through a simple Telegram message.

Fig. 1
To be able to carry out our project, we first need to download Telegram on our portable device, whether based on the Android, iOS or Windows Mobile operating system, by connecting to the store or on the web, at https://telegram.org/. Once the app is installed, using the search tool, we must search for Botfather, start it and create our bot that we will use to manage the LED tree (Fig. 1). Once we have started BotFather we find ourselves in front of the screen proposed in Fig. 2. In Fig. 3 you see an example of interaction through messages with BotFather, which speaks to us as if it were a user in the flesh and we can talk to it. In the specific case, by sending the message/start we issue the command that gives us the functionality and the respective syntax.
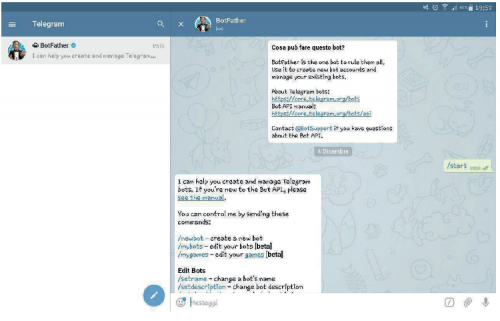
Fig. 2
From here, the procedure to follow to create our bot is very simple:
- send the command text/ newbot;
- choose a name;
- choose a nickname ending in “bot”.
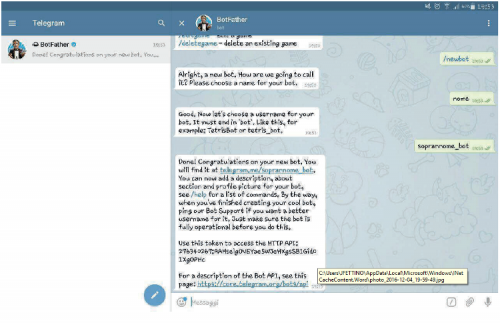
Fig. 3
Make a note of the access token because we will need it later. It will have to be something like:
276340267: AAHselgOVrYae5rJedXgsSBIGid01XgOPHc
Now we must allow the bot to communicate with us by activating it. Always in the search box we need to find our bot by searching for it using the nickname we have chosen for it.
Once the chat is open, we need to press Start as we did for BotFather. By doing this we will be able to communicate with the bot and he will be able to communicate with us.
The most attentive among you will not have missed an important detail: if to activate our bot it was enough to look for it and press start, this means that anyone can do it, but only those who created the bot can modify their properties through BotFather, or know its access token. Furthermore, each message sent to the Bot is marked by a user id to which we have access, so it is possible to insert a control in the code to execute only the instructions of the authorized ID. The remaining messages will be read but ignored.
THE FIRMWARE
So let’s get into the intricacies of the code; after including the necessary libraries and after setting the SSID, password with the commands:
#define MY_SSID “********”
#define MY_PASS “********”
we find the instruction that allows us to insert the Telegram Token:
#define MY_TELEGRAM_TOKEN “******: ********************”
After and only after entering these last two lines of code we insert:
FishGram.begin (F (MY_TELEGRAM_TOKEN));
This instruction initializes Fishgram with the Token of our bot.
The statement:
FishGram.messageEvent (FishGramHandler);
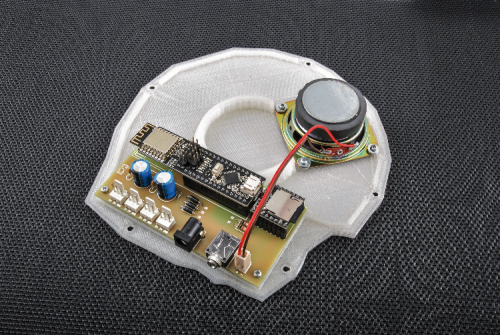
Fig. 4
Lets you call up the FishGramHandler routine every time a message arrives. In this routine we are going to verify the message is received (stored in the variable message) and if it is among those listed in the music commonly known oar its function. For example, to raise the volume the command is / volup and the code that manages this command is the following:
if (! strcmp (message, "/ volup"))
{if (vol <MAX_VOL-STEP_VOL) {
vol = vol + STEP_VOL;
} else {
vol = MAX_VOL;
}
setVolume (vol);
String ans = F ("Raise the volume. Volume level");
ans + = vol;
FishGram.sendMessage (id, ans.c_str ());
return true;

}
As you see in ans the answer that the bot will return is saved with the instruction FishGram.sendMessage (id, ans.c_str ()); is sent to the sender.
Table 1 – All commands sent by Telegram must start with the / character. As soon as you type / the bot offers you the commands managed by this bot, then just select the one required to send the message.
Table1
To upload the sketch from wireless you must download the application FishinoFlasher (from http://fishino.it) and then:
- set up the board for firmware upgrade;
-
launch FishinoFlasher;
-
select the firmware;
-
check the box “Activate sketch loading from Wi-Fi”; if this box is not present, it is possible that the flasher and/or firmware version is too old;
-
enter a name for your card, for example, “IlMioFishino”;
-
enter a port number for the Wi-Fi connection; we suggest you keep the 7777 default;
-
Click on the Flash button to start the firmware upgrade.
To program OTA Fishino Guppy it is necessary to create a “flying” connection between two pins on the ESPCONN connector and precisely between the GPIO5 and the ATM-RES; this is to allow the Wi-Fi module to reset the microcontroller. Now you have to upload (via USB) at least once a sketch that connects to your Wi-Fi router, to allow the Wi-Fi module to memorize the connection parameters and allow it to connect to your Wi-Fi network at startup. Once this is done, run the IDE and go to the door selection menu; you will see that a new door will appear with the name you assigned to Fishino during a firmware update.
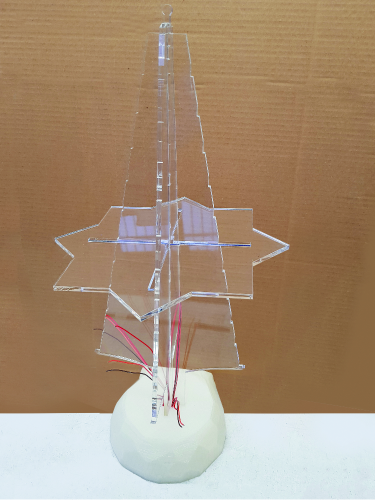
Fig. 5
Once the sketch is loaded, turn Fishino off and on and then let Fishino Guppy connect to your wireless network.
During the connection the start of the tree will initially be red, then yellow and finally, if everything went well, it will turn green. At this point you can send the commands with the smartphone or tablet you intend to use to interact with the tree.
The usable commands are divided into two categories and all correspond to text messages:
- those to manage the luminous animations produced by the Neopixel LEDs;
- those for playing MP3 music.
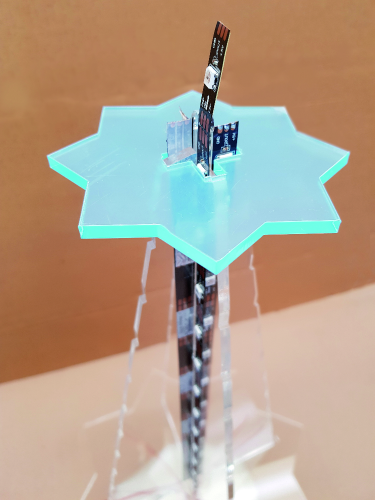
Fig. 6
All the commands are summarized in Table 1 (on the previous page) and must be written preceded by the slash; already writing the bar, our bot will suggest the possible commands.
The screen of the Telegram app during the chat with the bot that governs the Wi-Fi tree is the one proposed in Fig. 7 : as you can see, we have the commands given which are marked in blue because they are the messages we send to Fishino Guppy and in the cartoon, in black, answers.
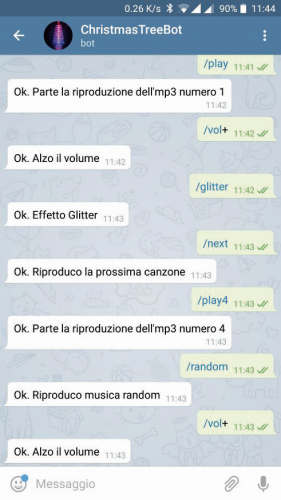
Fig. 7
Well, with this we have finished; we just have to wish you happy holidays in the company of your new Social-Christmas tree!
FROM OPENSTORE
STRIP 150 LED RGB ADDRESSABLE WS2812B – NEOPIXEL
Electronic set for Wi-Fi Christmas Tree
Plexiglass parts and base for Wi-Fi Christmas Tree

Related Posts


-
 Arduino ISP (In System Programming) and stand-alone circuits
We use an Arduino to program other ATmega without...
- Posted 12 years ago
-

-

-
 GSM GPS shield for Arduino
Shield for Arduino designed and based on the module...
- Posted 12 years ago
-
 Small Breakout for SIM900 GSM Module
Some post ago we presented a PCB to mount...
- Posted 13 years ago
-
 Join Maker Faire Rome 2024: Innovation Unleashed at Gazometro Ostiense | Calls Now Open!
All Calls Now Open for Maker Faire Rome 2024...
- Posted 1 week ago
-
 Building a 3D Digital Clock with Arduino
Project to create a digital clock consisting...
- Posted 4 months ago
-
 Acoustic amplifier – in DIY Kit
This kit creates a microphone amplifier with an output...
- Posted 5 months ago
-
 Creating a controller for Minecraft with realistic body movements using Arduino
Project of a controller that maps body movements...
- Posted 5 months ago
-
