- Building a 3D Digital Clock with ArduinoPosted 4 months ago
- Creating a controller for Minecraft with realistic body movements using ArduinoPosted 5 months ago
- Snowflake with ArduinoPosted 5 months ago
- Holographic Christmas TreePosted 5 months ago
- Segstick: Build Your Own Self-Balancing Vehicle in Just 2 Days with ArduinoPosted 6 months ago
- ZSWatch: An Open-Source Smartwatch Project Based on the Zephyr Operating SystemPosted 7 months ago
- What is IoT and which devices to usePosted 7 months ago
- Maker Faire Rome Unveils Thrilling “Padel Smash Future” Pavilion for Sports EnthusiastsPosted 7 months ago
- Make your curtains smartPosted 8 months ago
- Configuring an ESP8266 for Battery PowerPosted 8 months ago
The world of GIThub

Let’s learn all the aspects of the most renowned web hosting service, and familiarise with it, thanks to a sample application.
In the previous post, we let you know Git and in particular, we focused on explaining how to use it in order to archive a firmware project on your PC and to keep track of all the modifications applied in time. In this article, we would like to expand the subject and to enrich your knowledge by introducing you to GitHub, that some of you will know as a web hosting service; it enables the sharing of firmware projects and to contribute to them, by using the version control system that is typical of Git, and that we explained in the article dedicated to it.
But is GitHub just a data storage service on a cloud server, as many believe, or not? The answer is no! In fact, we may define GitHub as the Facebook of the programmers. Yes, that’s like it: with GitHub, it is possible to follow persons that introduce their projects in the repositories and to have people following us (followers).
Moreover, by creating our repository we may also be working along with other people, at the same time, on the version of the same project, and without having to worry about the consequences of applying substantial modifications, since GitHub will keep the original project safe: this is true since all the versions will be kept in the (previously created) repository, so to be able to recover them in case of need. Such an advantage comes from the fact that a different version of the project is associated to each developer.
Using Github
Let’s get to the point; we will not use command lines but we will only rely on the graphical interface; this is in order to facilitate the use of GitHub, even for those who are dealing with the versioning world (the creation and the management of different versions of the same firmware project) for the first time.
After having tested GitHub for you, we would like to show you how it works.
As a first thing we have to sign up for GitHub, on the website: https://github.com/ (Fig. 1). The procedure is quite a simple one: we need to create an account in order to access the website, therefore we need to create a username and a password, and to associate an email address to them. Let’s proceed with the authentication and see how to create a new project:
- let’s check the “Unlimited public repositories for free” box, given that by means of this article we aim to share a completely free file;
- let’s proceed by answering the questions concerning the programming level and so on.

Fig. 1
Before starting a new project we have to verify the email address we gave. Please wait for about 5 minutes and confirm via the link that GitHub will have sent to your email address.
What we have to do now is to start a new project, by clicking on the “Start a new project” button, that enables the creation of our repository (Fig. 2); as with Git, a repository is a container used in order to save and archive a project, composed of files (for example, images, video, text).

Fig. 2
Let’s give a name to our “Repo” (in our case we chose “test_futura”), and check the “Public” box and click the “Initialize this repository with a README” box, as shown in Fig. 3.

Fig. 3
We may now create our first repository by clicking on the “Create Repository” button.
If you followed all the passages, you will display the image as in Fig. 4, as well as our container, completed with a description and ready to host the files that will be added later. In this way, we will have created our first repository, named test_futura.

Fig. 4
We may now decide whether to create a new file or to upload a file (uploading from the PC) to be added to the repository; in our example, we will create a new file, an operation that is carried out by clicking the “create a new file” button (Fig. 5).
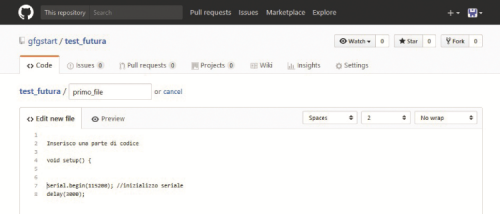
Fig. 5
In the upper part of the web page there are the tools for the file editing; once the latter has been completed, we have to act as if we were using Git. As in Git, every saved modification is called a commit, and each commit carries a message explaining the kind of modification that has been included, so to keep track of all the modifications applied in time. We will now commit the file in the test_futura repository (Fig. 6).
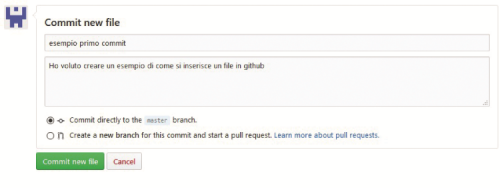
Fig. 6
Let’s add a name to give to the commit and a short description; finally, given that it is the first commit, we will leave “Commit directly to the master branch” checked. Let’s click now on the “Commit new file” button and see what happens: we will be before the screen shown in Fig. 7.
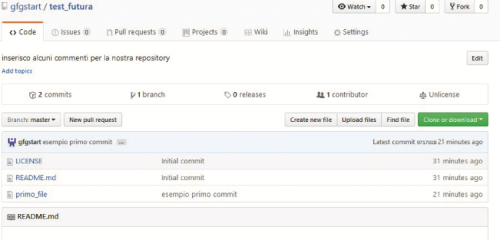
Fig. 7
In practice, and almost “magically”, our file was correctly added in the “test_futura” repository; we may easily click on the “primo_file” title and see inside of it. Since we have understood this mechanism, we may directly create files on GitHub or upload as many files as we want!
Let’s make a step forward and imagine we uploaded many files, if not a whole project, in our repository. Well, and what could we do now? How may we download a single file from our repository on our Personal Computer, so to work offline? Well, nothing easier; let’s click on the green “Clone or download” button (Fig. 8) and choose to download the zip file.
We would like to remind you, moreover, that you may also explore the GitHub website and download whole repositories from other users; for example, if you use “Arduino” as a search key, you will see how many projects it is possible to get and how much code you will find for the download, by proceeding as in this example.
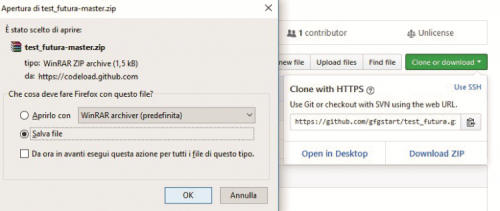
Fig. 8
Once it has been downloaded, please extract the files from the folder; the result should be a folder named as “nome repo_master”; in our case, therefore, it would be test_futura_master. Inside you will find the files we added, with the addition of the license.txt and readme.txt files.
That’s all clear until now; but what if more than one person wanted to work on the same project? And what if we also wanted to have a working copy, so to carry out some modifications? How could we achieve that? The answer is: let’s create a “branch”. But what does it mean to create a branch?
Do you remember the test_futura name, that is to say, the name we gave to our repository? Well, that’s the master branch, and therefore the current version of our project.
If we wanted to work on more than one version of the same project, we would have to create a branch, that is, a copy of the current project; what occurs is the creation of a branch and from that moment on, a second timeline is created. If you think of the potentialities of this tool, it is obvious that the more branches we create, the more people will be able to work on different versions of the project at the same time, without the original project being modified.
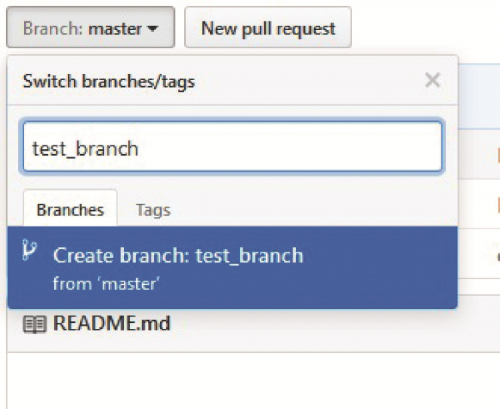
Fig. 9
Only when the branch is validated, it will be possible to merge it with the main project, that from that moment on will turn out to be modified.
In order to make you feel involved in what we want to explain, we will show you a real example; as a first thing, create a branch of our repository, to which we will give a name of our liking: in our case, that’s “test_branch”. For the purpose, and with reference to Fig. 9, we will click on the branch: master button and type “test_branch”, after that we will click on the blue “Create branch: test_branch” button.
Excellent: we now obtained two identical branches! We may, therefore, apply all the modifications we want to the branch named “test_branch”, and leave the master repository unaltered.
Well, let’s proceed by selecting the README.md file: let’s click on the pencil-shaped icon, so to be able to edit the file and add some lines containing some sentences of your liking, as shown by the example in Fig. 10.
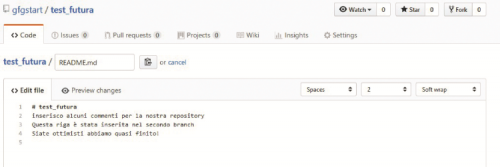
Fig. 10
Once we’re done, let’s add some comments (so to remember the kind of modification) in the space reserved for this purpose, at the bottom of the page, and finally let’s click on the green “Commit changes” button, so to add and save them (Fig. 11).
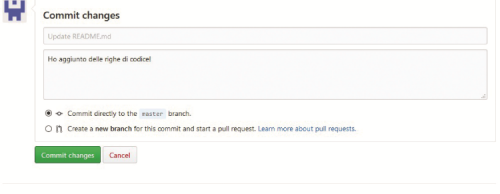
Fig. 11
At this stage, we may claim that we have a master repository containing the original project and a test_branch repository, that is our working folder, the one containing the modified Readme.md file; if we wanted to, we could go on at leisure and modify as many files as we wanted, but – to return to our previous example – we have to steer and validate our modification, so to join it to the master repository by means of the pull requests.
The pull requests are the tool that enables us to propose the modifications, so to then join them to the branch. They are enabled at each commit, and they may be used by the team, so that the collaborators may revise the modifications by discussing them, or in our case, we will go to open a pull request and it will be us to validate and merge it.
As you may see from the picture in Fig. 12, we will now select the pull requests menu.
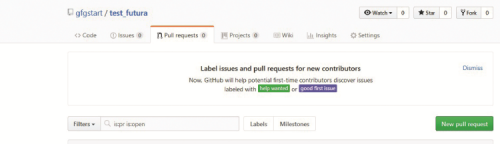
Fig. 12
We will have to remember to select the branch named as “test_branch”, to which we applied the modifications for the purpose of merging with the master (so to have a comparison of the modifications) and let’s click on the green icon named as “New pull request”. As you may see in Fig. 13, from the comparison of the files we may notice the code or the text we wrote in the “test_branch”, in green; in the case you had deleted some lines, you will display some red lines on the left side. Finally, let’s create on the green “Create pull request” icon. Once this has been done, a new menu will appear, in which it is possible to add a title and a description of the modifications; once this has been done we will have to click again on the “Create pull request” button.

Fig. 13
We are now on the home straight and all that is left to do is to merge the modifications with the master repository; for the purpose let’s click on the green “Merge pull request” icon (Fig. 14), so to merge the modifications with the master branch.
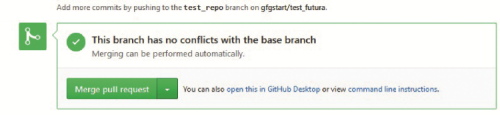
Fig. 14
While in the window that will be opening, we will, therefore, have to click on the green “Confirm merge” button (Fig. 15): by means of this operation we confirm and carry out the merging of the modifications. Finally, we managed to transfer the modifications to the master branch! All that is left to do now is to delete the “test_branch” by means of the ”Delete branch” icon, that is shown as purple in Fig. 16, given that all the modifications have been correctly imported and that therefore we do not need what we could now consider as a redundant copy.

Fig. 15

Fig. 16
Conclusions
We have therefore reached the objective we proposed in this article, and we are now able to say what GitHub is, how the repositories and the commits are created, and how to use the Pull Requests for the purpose of merging the branches.

Related Posts


-
 Arduino ISP (In System Programming) and stand-alone circuits
We use an Arduino to program other ATmega without...
- Posted 12 years ago
-

-

-
 GSM GPS shield for Arduino
Shield for Arduino designed and based on the module...
- Posted 12 years ago
-
 Small Breakout for SIM900 GSM Module
Some post ago we presented a PCB to mount...
- Posted 13 years ago
-
 Join Maker Faire Rome 2024: Innovation Unleashed at Gazometro Ostiense | Calls Now Open!
All Calls Now Open for Maker Faire Rome 2024...
- Posted 2 weeks ago
-
 Building a 3D Digital Clock with Arduino
Project to create a digital clock consisting...
- Posted 4 months ago
-
 Acoustic amplifier – in DIY Kit
This kit creates a microphone amplifier with an output...
- Posted 5 months ago
-
 Creating a controller for Minecraft with realistic body movements using Arduino
Project of a controller that maps body movements...
- Posted 5 months ago
-
