- How to Adjust X and Y Axis Scale in Arduino Serial Plotter (No Extra Software Needed)Posted 7 months ago
- Elettronici Entusiasti: Inspiring Makers at Maker Faire Rome 2024Posted 7 months ago
- makeITcircular 2024 content launched – Part of Maker Faire Rome 2024Posted 9 months ago
- Application For Maker Faire Rome 2024: Deadline June 20thPosted 11 months ago
- Building a 3D Digital Clock with ArduinoPosted 1 year ago
- Creating a controller for Minecraft with realistic body movements using ArduinoPosted 1 year ago
- Snowflake with ArduinoPosted 1 year ago
- Holographic Christmas TreePosted 1 year ago
- Segstick: Build Your Own Self-Balancing Vehicle in Just 2 Days with ArduinoPosted 1 year ago
- ZSWatch: An Open-Source Smartwatch Project Based on the Zephyr Operating SystemPosted 1 year ago
The Open Source Snow Plow Robot: discovering the Firmware
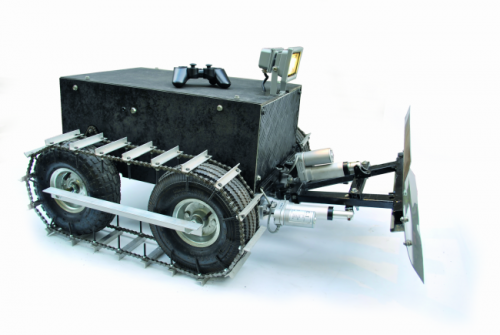
Just a few weeks ago, we presented in this blog the maker version of a motorized snowplow, similar to those available in many bricolage shopping malls. In fact our robot is a particular caterpillar track, a miniature version of the traditional snowplow but that can be radio controlled easyly with Sony PS2 controller. In the first post we described the hardware of the project, ie the mechanics and the electronic controller, explaining that it is completely based on Arduino Uno. In this post, we will describe the firmware to be loaded on Arduino to perform all the functions required, to operate the driving motors, control the blade and turn on/off the front projector according to commands received via radio.
A BRIEF SUMMARY
The snowplow electrical and electronics parte are based on Arduino Uno Rev. 3, which hosts three shields and interfaces with these cards:
- the motor driver DRI0018;
- the relay circuit RELAY1CH;
- the DC / DC converter step up STEPUP30VADJ.
The shields mounted on Arduino are the motor shield to control the three linear motors that manage the movement of the blade, and the PS2SHIELD, which allows you to interface with the console PlayStation 2 (PS2); the latter shield requires that there is mounted, by inserting it into the connector, the RX-PS2, which is a 2.4 GHz radio receiver for receiving specific commands from the aforementioned console.
All boards and elements used in the circuit can be purchased in our store. The power source is made by a series of two lead-gel batteries by 7.2 Ah: we take the 12V on the mid-point of the two, while between the negative and the positive of the series we take 24 volts.
With 12 volts, we power Arduino, which will power the logic of the shield through its pin-strip; a LED (internally equipping the limiting resistor) will indicate when Arduino is on.
The 12 volt are also used for the power section of the Motor Shield; in fact, considering the high absorption of the three linear actuators, it is unwise to take the 12V directly from Arduino: you must opt for the external power supply to be connected to the appropriate terminal PWR.
Each linear actuator consists of a gear motor, 12 Vdc, using a worm screw to move a shaft back and forth along its length (maximum excursion of 5 cm). The actuator has a dynamic load of 50 kg and a maximum speed of 1.3 cm/s. It can support up to about 250 kg, when not moving, and the torque screw ensures the maintenance of the position of the shaft even in the absence of power.
Two limit switches stop the engine when it reaches the maximum extension and contraction, while the diodes allow reverse direction after reaching the limit point. The actuator is made of metal and is sealed to protect it from dust and water, mandatory condition to operate in the snow.
The 24V power supply line is used to power the section of the snowplow, namely the traction and the projector (optional) sections: the first is based on the power motor driver DRI0018, to be connected with four wires to the corresponding Arduino digital lines. The output terminal of the module connects the two 24 volt motors used for traction.
In addition to the engine controller, the 24 volt supplies power to the section of the LED projector, whether you mount or not, and whose lighting is adjusted according to the environmental lighting conditions detected by the photoresistor in the electronics of our snowplows.
The projector is designed to operate at 220 Vac, however, since this voltage is not available on the robot, to avoid using an inverter we modified the projector by opening it, removing the AC / DC and bringing the two wires of the power LED to a DC / DC converter (cod. STEPUP30VADJ); the latter is a switching adjustable output voltage regulator, which should be tuned in order to provide right current to make the LED working at about 10 watts.
Receiving data from the remote control is the task assigned to the shield PS2SHIELD, for which the manufacturer makes available the specific library that we integrated in the Arduino sketch. The shield performs the command receiving and decoding; 2.4GHz radio is supplied separately (RX_PS2) and must be inserted into the connection of the shield.
FIRMWARE
// Sketch Open Source Snow Plow Robot
// by Vittorio Loschiavo


#include <Shield_PS2.h>

//declare class objects
PS2 ps2=PS2();                    //PS2 class object: ps2

int FOTORES = A0;
int RELAY = 13;
int sensorValue = 0;

int ALZAPALA = 12;
int ONALZAPALA = 11;
int RUOTAPALA = 2;
int ONRUOTAPALA = 3;

int E1 = 5;  //MOTORE 1 SPEED CONTROL M1_PWM
int E2 = 6;  //MOTORE 2 SPEED CONTROL M2_PWM
int M1 = 4;  //MOTORE 1 DIRECTION CONTROL M1_EN
int M2 = 7;  //MOTORE 2 DIRECTION CONTROL M2_EN

int counter=0;
int stato=0;
int val=0;
int velo=0;
int motori=0;

void setup()
{
  Serial.begin(9600);
   ps2.init(9600, 8, 9);   //initialize the main board to use desired (baudrate, rx, tx)
                           //for Arduino Mega use RX:10, TX: 11 for software serial
                           //for Arduino Leonardo use pin 8, 9, 10, 11 as RX and TX for software serial

  pinMode (FOTORES, INPUT);
  pinMode (RELAY, OUTPUT);
  pinMode (RUOTAPALA, OUTPUT);
  pinMode (ALZAPALA, OUTPUT);
  pinMode (ONRUOTAPALA, OUTPUT);
  pinMode (ONALZAPALA, OUTPUT);
  pinMode (E1, OUTPUT);
  pinMode (M1, OUTPUT);
  pinMode (E2, OUTPUT);
  pinMode (M2, OUTPUT);
  stato=0;

}
void loop(){
    motori=0;
  if( ps2.getval(p_up)==0 || ps2.getval(p_joy_lu)==100) {
    Serial.println("AVANTI");    //
    analogWrite (E1,velo);      //PWM Speed Control
  digitalWrite(M1,HIGH);        //
  analogWrite (E2,velo);        //
  digitalWrite(M2,HIGH);       ///
  motori=1;
      }
  if (ps2.getval(p_down)==0 || ps2.getval(p_joy_ld)==100) {
    Serial.println("INDIETRO");
   analogWrite (E1,velo);
  digitalWrite(M1,LOW);
  analogWrite (E2,velo);
  digitalWrite(M2,LOW);
  motori=1;
      }
  if (ps2.getval(p_right)==0 || ps2.getval(p_joy_lr)==100){
    Serial.println("DESTRA");
   analogWrite (E1,velo);
  digitalWrite(M1,HIGH);
  analogWrite (E2,velo);
  digitalWrite(M2,LOW);
  motori=1;
    }
  if (ps2.getval(p_left)==0 || ps2.getval(p_joy_11)==100) {
    Serial.println("SINISTRA");    //
     analogWrite (E1,velo);      //
  digitalWrite(M1,LOW);          //
  analogWrite (E2,velo);         //
  digitalWrite(M2,HIGH);        //
  motori=1;                     //
       }
  if (ps2.getval(p_triangle)==0) {
    Serial.println("TRIANGOLO"); //
    if (velo<250)              //
{                              //
   velo=velo+25;              //
   }                          //
else                          //
{                            //
ps2.vibrate(2, 255);         //
delay(500);                  // 500 ms
ps2.vibrate(2,0);            //
 }                           //
  analogWrite (M1, velo);    //
    analogWrite (M2, velo);   //
 Serial.println(velo);
      }
  if (ps2.getval(p_cross)==0) { //
    Serial.println("X");        //
    if (velo>0 && velo<=250)    //
{                               //
  velo=velo-25;                //
   }
else
{
//non fa niente
}
    analogWrite (M1, velo);
    analogWrite (M2, velo);
   Serial.println(velo);
      }
  if (ps2.getval(p_circle)==0) {
    Serial.println("CERCHIO");
    if (stato==0)
    {                               //
     stato=stato+1;
     delay(100);
     Serial.println(stato);
     digitalWrite(RELAY, HIGH);
     ps2.vibrate(2, 255);         //
    delay(500);                  // 500 ms
    ps2.vibrate(2,0);            //
    delay(500);
    ps2.vibrate(2,255);
    delay(500);
    ps2.vibrate(2,0);
      }
else
{
stato=0;
delay(100);
Serial.println(stato);
digitalWrite(RELAY, LOW);
ps2.vibrate(2, 255);         //
    delay(500);                  // 500 ms
    ps2.vibrate(2,0);            //
}
     }
  if (ps2.getval(p_square)==0) { //
    Serial.println("QUADRATO");
      digitalWrite(E1,0);
  digitalWrite(M1,LOW);
  digitalWrite(E2,0);
  digitalWrite(M2,LOW);
  velo=0;
     }
  if (ps2.getval(p_l1)==0) {
    Serial.println("L1");
    digitalWrite (ONALZAPALA, HIGH);  //
digitalWrite (ALZAPALA, LOW);     //
   }
 if (ps2.getval(p_l1)==1) {
    Serial.println("L1");
   digitalWrite (ONALZAPALA, LOW);  //
digitalWrite (ALZAPALA, LOW);     //
     }
  if (ps2.getval(p_l2)==0) {
    Serial.println("L2");
     digitalWrite (ONRUOTAPALA, HIGH);  //
digitalWrite (RUOTAPALA, LOW);     //
         }
          if (ps2.getval(p_l2)==1) {
Serial.println("L2");
digitalWrite (ONRUOTAPALA, LOW);  //
digitalWrite (RUOTAPALA, LOW);     //
     }
  if (ps2.getval(p_r1)==0) {
    Serial.println("R1");
    digitalWrite (ONALZAPALA, HIGH);  //
digitalWrite (ALZAPALA, HIGH);    //
       }
  if (ps2.getval(p_r2)==0) {
    Serial.println("R2");
    digitalWrite (ONRUOTAPALA, HIGH);  //
digitalWrite (RUOTAPALA, HIGH);    //
     }
  if (ps2.getval(p_start)==0) {
    Serial.println("START");
        }
  if (ps2.getval(p_select)==0) {
    Serial.println("SELECT");
                }
  if (motori==0) { //
       analogWrite (E1,0);
  digitalWrite(M1,LOW);
  analogWrite (E2,0);
  digitalWrite(M2,LOW);
}
  sensorValue = analogRead(FOTORES);
  Serial.println(sensorValue);
 if (sensorValue<30 || stato==0) {
   // {
    digitalWrite(RELAY, HIGH);
        }
else
{
  digitalWrite(RELAY, LOW);
delay(100);
{
  //non fa niente
  }
}
}
Well, after summarizing the making and characteristics of the snowplow, we can move on to what interests you most: the firmware, that is the sketch to upload in Arduino Uno so that it can control the snowplow passing him the commands sent by the controller of the PlayStation 2.
The firmware of the robot is relatively simple; to understand its structure is appropriate, first, to spend a few words on the controlled shield and, in particular, on the PS2 one. In fact on the Motor Shield we have already told a lot in other articles because we have used it in various projects, so we’ll just say that its management deals with the special library that we have already planned to include in the sketch and requires a PWM signal and an “enable” logical level. We explain a bit the relevant features of the Shield PS2 and the main functions of the library dedicated to it.
The shield allows you to use the wireless controller (or the wired one) of the Playstation 2, allowing remote control of robots or other devices; for as it was designed, can be used with Arduino Uno Rev 3, Duemilanove, Mega and Leonardo. It is equipped with a reset button to mirror Arduino’s, with jumpers to set various Baud Rates (9,600, 57,600, 115,200 bps), and a status LED and jumpers to select pins used for TX and RX data, alternative to the UART default.
We say that Arduino Uno pins D0 and D1 match the hardware serial and that their meaning is, respectively, TX and RX. However, it is possible to reallocate the TX and RX lines via software, assigning them to other pins (TX: pins 1, 3, 9, 11 – RX: 0, 2, 8, 10) by loading the appropriate library New Software Serial, which allows to emulate the serial port on other pairs of digital I / O not already used by other hardware resources (or other shields).
Note that if you use the pins of the serial hardware (D0, D1), remember to unplug the PS2 connector from the Shield before you begin to program Arduino Uno.

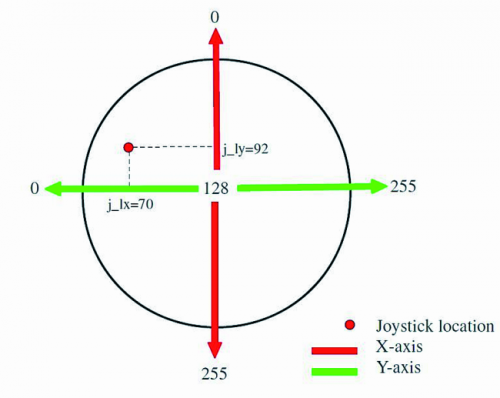
The PS2 shield is able, through the appropriate library, to recognize and manage all the buttons and analog sticks of the PS2 controller. Each analog joystick (left and right) has two axes (X and Y) and two output formats: analog 1 and 2. In the format “analog output 1” there are two variables for each joystick: axes X and Y. Based on how you move the joystick, you get an output value from 0 to 255, corresponding to the position of the lever.
Y axis:
• Central location (neutral), the value is 128.
• Pushing up, the value changes from 128 to 0
• Pushing down, the value changes from 128 to 255.
X-axis:
• Central location (neutral), the value is 128.
• Pushing to the left, the value changes from 128 to 0.
• Pushing to the right, the value changes from 128 to 255.

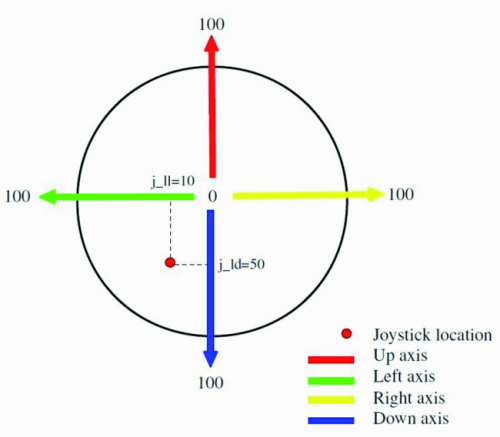
In the “output analog 2” there are four variables for each joystick (up, down, left and right). When the user moves the joystick in one direction, the value of the 4 variables changes from 0 to 100. The joystick left and right will have four independent variables each.
As for the PS2 controller buttons management, simply check the status of the button that interests us and read the return value, which can be:
• 0 if the button is pressed;
• 1 if the button is not pressed.
For example, if we want to know if you pressed the button “UP”, we will have to write the following statement:
ps2.getval (p_up) == 0
It is also possible to replace “p_up” with the corresponding decimal value, which in this case is “4”.
The shield PS2 is also able to handle the two small engines in the PS2 controller, that determine the vibration (left and right): the relative commands require two bytes of data, the first of which indicates which motor must vibrate, while the next byte (second byte) indicates the state of the engine or the speed.
To use the shield that handles commands from the controller of the PS2 we used the library Shield_PS2.h. At the beginning of our sketch we include with the statement “#include <Shield_PS2.h>”, the library needed to control properly the shield.
Let’s go ahead and see the control of the LED projector, which is operated via the Arduino Uno Rev3 analog pin A0, which is connected to the photoresistor that detects the ambient light; when the lighting goes below the threshold, the sketch activates the projector, or rather, it provides the high logic state to the card RELAY1CH, which contains a relay activated by logic levels. In our project, we use the exchange between Closed and Normally Open and with it we trigger the power supply to the DC / DC converter that powers the projector, so when Arduino Uno takes the logic state 1 (via its digital pin 13) the relay clicks and closes the aforementioned contacts, turning on the LED projector.
Continuing with the description: let’s look at the management of the three linear actuators that allow you to lift / lower and turn right / left the blade. Since that requires a certain current, it is unsafe to drive them directly with Arduino lines so we have chosen a power driver interface, which specifically is the Motor Shield.
Since this card needs to be driven through PWM signals, the firmware that we designed sends to digital pins 2:11 PWM signals and to pins 3:12 the enable signals directed to the Motor Shield.
As for the traction motors MY016, also in this case Arduino One can not drive them directly but manages them through two digital pins that provide the control signals to the corresponding power driver. The pins used for the purpose are 5 and 6, sending PWM signals with which the drivers provide pulses of variable width so as to modulate the power supplied to the motors. In the sketch, the PWM engine control is set to variables “E1” and “E2”, corresponding respectively to the digital pins 5 and 6. The digital pins 4 and 7 correspond to the variables, respectively, “M1” and “M2”.
In summary, for the management by Arduino Uno we created the following variables: “FOTORES” for the photoresistor, “RELAY” for the activation of the relay that turns on the projector, “SensorValue” where is stored the value of the photoresistor.
The variables that handle the raising / lowering of the blade are “ALZAPALA” and “ONALZAPALA”, while those who run the left / right movement of the blade are “RUOTAPALA” and “ONRUOTAPALA”. The variables of the engine are, as already said, “E1”, “E2” and “M1”, “M2”. The variable “VELO” is the one where you save the value of the speed of the engines, while the “MOTORI” is the one where you save the state of the engines and allows you to stop the engine once the direction buttons or joystick are released. The variable “stato” is related to the management of the LED projector: if is 0, the power on/off is subject to the condition of illumination of the photoresistor, while if it is 1 you control the projector with the button of the PS2 controller.
Since we have no feedback to know which function is enabled, the controller activates the vibration; to be exact, the PS2 controller vibrates twice and for a short period for the “button”, and once for the photoresistor (Listing 1):
For pin TX and RX respectively, we used the pin 9 and pin 8, while as baud rate we selected 9,600 Baud.
The instruction “ps2.getval (p_up) == 0” allows you to know which button was activated on the PS2 controller: in our case we have inserted “(p_up) = 0” that lets you know if you pressed the controller button “Up “; if you want to use another button, you can replace the current one with the button that interests you (in Listing 2 find the list).
You can also replace it with “(p_joy_lu) == 100” to know if the left joystick is in the “UP” or replacing it with “(p_joy_ld) == 100” you can know if the joystick is in the “Down”, “(p_joy_lr) == 100” if it is “Right” and “(p_joy_11) == 100” if it is “Left”. Finally, you can use the two statements together with “if (ps2.getval (p_up) == 0 || ps2.getval (p_joy_lu) == 100)” that lets you know if the “UP” button is pressed or the left joystick is “UP”.
Our sketch begins checking the value of the variable “MOTORI”, set with a value equal to “0”. If you press the button “Up” or the left joystick is moved to the position “Up” [if statement (ps2.getval (p_up) == 0 || ps2.getval (p_joy_lu) == 100)], corresponding in our case to forward movement, the motors will be activated with the value of PWM speed “VELO”, that can be incremented from 0 to 250 with the button “triangle” and decreased with “X”. When it reaches the maximum speed value, corresponding to 250, on the controller is activated for a short period the vibration.


Pingback: Robot Projeleri | CCS C ile Pic Programlama
Pingback: 100+ Robotics Projects for Final Year Engineering Students » The Shastra Phoenixbioinfosys