- How to Adjust X and Y Axis Scale in Arduino Serial Plotter (No Extra Software Needed)Posted 7 months ago
- Elettronici Entusiasti: Inspiring Makers at Maker Faire Rome 2024Posted 7 months ago
- makeITcircular 2024 content launched – Part of Maker Faire Rome 2024Posted 9 months ago
- Application For Maker Faire Rome 2024: Deadline June 20thPosted 10 months ago
- Building a 3D Digital Clock with ArduinoPosted 1 year ago
- Creating a controller for Minecraft with realistic body movements using ArduinoPosted 1 year ago
- Snowflake with ArduinoPosted 1 year ago
- Holographic Christmas TreePosted 1 year ago
- Segstick: Build Your Own Self-Balancing Vehicle in Just 2 Days with ArduinoPosted 1 year ago
- ZSWatch: An Open-Source Smartwatch Project Based on the Zephyr Operating SystemPosted 1 year ago
Robofish: create your robot fish with Arduino
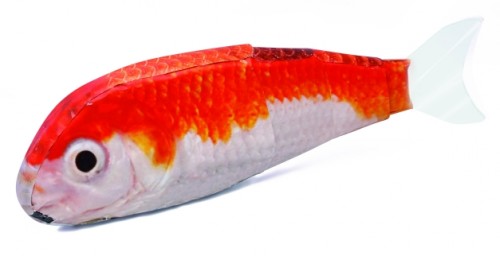
Today we introduce you a robot fish that is able to swim and recognize tank edges and obstacles. We’ll find out how we can easily create it with common insulating material and a few servo motor controlled by Arduino.
[iframe_loader src=”http://www.youtube.com/embed/HUIy6XApZos?hl=it&fs=1″ height=”349″ width=”425″ ]
The mechanical part
For the fish body we used common polystyrene as the one used as insulating material for walls. Inexpensive, very robust and lightweight: it floats easily and is easily moldable. Great deal.
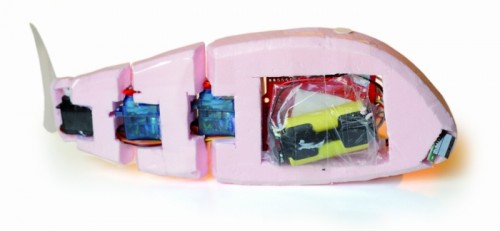
To make fish’s swimming more realistic, we need three joints between the trunk and the caudal fin. As actuators we have chosen of common modeling servos: small, powerful enough and easily controlled by a microcontroller.
The servos are ideal because with them you can manage the movement of a small shaft connecting all segments of the fish, varying at will the position, even a few degrees.
The fish body is divided into a central part and three parts, each of which moved by a servo. The caudal fin is made with plastic recycled from supermarket goods packages.
The flexibility of the fin allows you to give more realism to movement. To obtain harmonic motion, each part is attached to the next by a servo: the body of the servo should be glued on a body segment while the servo arm (connected to the shaft) shall be glued on the next.
Obviously Robofish needs a system to detect obstacles such as the tank edges. To create this, we used two Sharp GP2Y0D805PCB infrared sensors with digital output. These components can detect objects up to 5 cm and are quite easy to manage. Once encased in a plastic bag, can operate in water.
Position the sensors on the front, tilted to 45°, one on left and one on the right. Then carve out the room for control, batteries and sensors.
The profile of the fish is at your choice. Don’t worry too about weight as in our prototype we added 460g of further weight to ensure right level of floating.
Electrical connections
As control we opted for an Arduino-compatible Board produced by Seeedstudio but any Arduino board will do. Four simple AA batteries will provide a voltage compatible with the servo feed, while the Arduino board derives its tension thanks to its internal 5 volt regulator.
As it is difficult to use a conventional switch (you can’t handle it since everything is covered in plastic) we used a small magnetic contact, such as those used to detect the windows opening. It consists of a Reed contact activated by a small magnet. Place the contact on the outer edge of the robot so by approaching the magnet, you can activate the circuit. This explains that little bump on the head of the robots seen in the video.
Of course, the robot fish will work until the magnet is on his head. Clever and cheap.
The firmware
// ROBOFISH
// di Segatello Mirco
#include <Servo.h>
Servo Servo1, Servo2, Servo3; // create servo object to control a servo

int i, time, obstacle;
int pos1, pos2, pos3;
int pos1R, pos2R, pos3R;
int phase=45;
int velocity=2000;
int maxDeflexion=20;
int maxDefobs=20;
int actualTime;
float shift;
const int center1=98;
const int center2=90;
const int center3=105;
const int sens_SX=5;
const int sens_DX=6;
const int lostTime=3000;

void setup()
{
Servo1.attach(4);
Servo2.attach(3);
Servo3.attach(2);
pinMode(sens_SX, INPUT);
pinMode(sens_DX, INPUT);
pinMode(13, OUTPUT);
time=velocity/360;
shift=0;

}

void loop()
{
for (i=0; i<360; i++) {

pos1 = i+2*phase;
pos2 = i+phase;
pos3 = i;

if (pos1>359) pos1-=360;
if (pos2>359) pos2-=360;
if (pos3>359) pos3-=360;

if (pos1>179) pos1=360-pos1;
if (pos2>179) pos2=360-pos2;
if (pos3>179) pos3=360-pos3;

pos1R=map(pos1,0,180,center1-maxDeflexion-obstacle,center1+maxDeflexion-obstacle);
pos2R=map(pos2,0,180,center2-maxDeflexion-obstacle,center2+maxDeflexion-obstacle);
pos3R=map(pos3,0,180,center3-maxDeflexion-obstacle,center3+maxDeflexion-obstacle);

Servo1.write(pos1R);
Servo2.write(pos2R);
Servo3.write(pos3R);
delay(time);

obstacle=int(shift);

if (digitalRead(sens_DX)==0) {
if (obstacle<maxDefobs) shift=shift+0.05;
actualTime=millis();
}
if (digitalRead(sens_SX)==0) {
if (obstacle > (-maxDefobs)) shift=shift-0.05;
actualTime=millis();
}

if (digitalRead(sens_SX)==1 && digitalRead(sens_SX)==1 && obstacle!=0)
if (millis()>actualTime+lostTime) {
if (shift>0) shift=shift-0.05;
if (shift<0) shift=shift+0.05;
}
}
}
Using Arduino it’s easier as cabling is easy and immediate and the realization of the sketch is deadly simple.
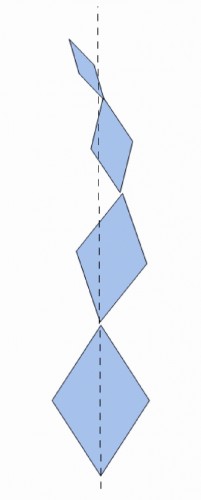
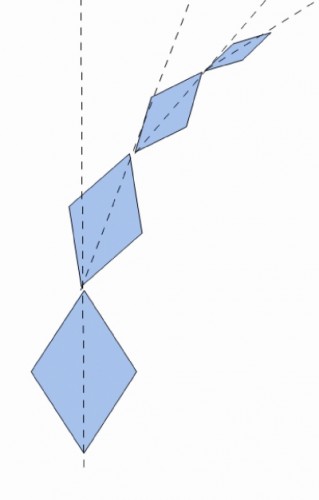
Servo movement is repetitive and follows a precise scheme. We provided the ability to personalize few variables so that you can test different kinds of swimming. The swim takes place by moving the three servos in synchronous, according to a pattern that resembles the letter s: each segment varies slightly out of phase with respect to the previous.
For the servo movement we used servo.h library, already available on the Arduino IDE. You simply declare the servo and the multi-touch corresponding output using the servo. attach (pin). The servo.detach() method allows to release the output from the servo to use it eventually as PWM output. Commands managing servos movement are two.
The first, ServoWriteMicroseconds, allows you to set the position of the servo command by specifying the length in microseconds. The value in this case should be between 1,000 and 2,000 µs. The midpoint of 1500 corresponds to the neutral position respect the shaft line. The second statement, Write, allows positioning by specifying the angle in degrees: the value of the angle must be between 0 and 180°, 90° intermediate value corresponding to the neutral position of the servo.
The two sens_SX and sens_DX named sensors are wired respectively on pins 5 and 6. In the main loop there’s is a for cycle that increments the i variable at regular intervals from 0 to 360 cyclically, in a total time defined by the variable velocity.
The value of the i variable together with that of phase, determines the position of the servo motors. This value is referred to a full 360° loop and then must be offset, keeping in mind the neutral position of the servo, of the potential shift and that of the maximum deflection you want to give to the movement.
The latter is defined by the variable maxDeflexion (decimal degrees) and defines the maximum deflection of each stroke: the higher this value, the wider will be the movement of the three trunks of the fish.
With phase set to 0 mail all the servo will move along; increasing this value introduces a phase shift between the servo position. As a result you will get a movement that is similar to the letter S, the more pronounced the greater the value of phase is.
When detecting obstacles, the neutral position of the servo moves gradually on the opposite side of the obstacle. In this way, the fish will describe an arc of circle away from the obstacle.
The arc can be controlled through maxDefobs variable: the higher this value, the more will be the swim line curvature. When the obstacle is no longer being detected (time controlled with lostTime), the servo motion resumes to go regular. Each servo PIN range between-maxDeflexion and + maxDeflexion, while if an obstacle is detected it ranges between the values of -maxDeflexion + maxDefobs and maxDeflexion + maxDefobs.
Testing
Before testing the robot into water you must carefully check every mechanical and electrical connection. Turn the fish on and control the movements and ensure that both sensors provide signal to the Arduino. Use a multimeter to measure the voltage on their output: in the absence of obstacles the signal should be high. Checking voltage supply is not a bad idea: make sure is at least 5.5 V.
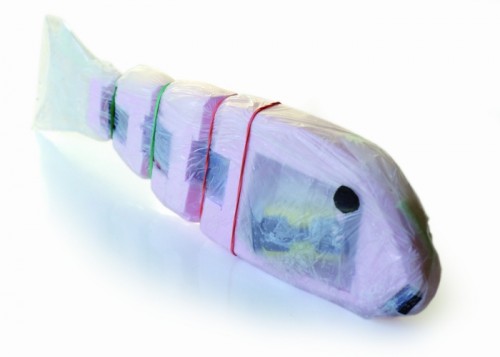
At this point we’re ready to waterproof the robot: there are many solutions, we have introduced the robot in a plastic bag (breathe inside to see if it has holes and seal it with duct tape). Use rubber bands to keep the bag lying close to the body of the robot and make sure the servo are free to move.
The swim will take place in surface water: you’ll probably have to weigh down the robot with sufficient wright to keep it at the correct height. As mentioned above, in our prototype, we added like 460 grams. Once the robot floats in the right way you can turn it on by placing the small magnet and let him sinuously swim in digital freedom.
From Openstore






Pingback: robotics | Pearltrees
Pingback: Robofish: create your robot fish with Arduino | Open Hardware News | Scoop.it
Pingback: Arduino | Pearltrees
Pingback: Robofish: el pez robot potenciado con Arduino!! » SAWERS TECHNOLOGY
Pingback: Robofish: An Arduino Controlled Robotic Fish | Spell FoundrySpell Foundry
Pingback: 19 Awesome Robots You Can Build With an Arduino | Random Nerd Tutorials
Pingback: Model And Implementation Of Robotic Arm Using Android | world Best
Pingback: Happy new year from Open-Electronics.org: best posts in 2016, thank you! | Open Electronics
Pingback: Robot Projeleri | CCS C ile Pic Programlama
Pingback: 200+ Arduino Projects List for Final Year Students- Engineering Solutions
Pingback: 100+ Robotics Projects for Final Year Engineering Students » The Shastra Phoenixbioinfosys