- How to Adjust X and Y Axis Scale in Arduino Serial Plotter (No Extra Software Needed)Posted 7 months ago
- Elettronici Entusiasti: Inspiring Makers at Maker Faire Rome 2024Posted 7 months ago
- makeITcircular 2024 content launched – Part of Maker Faire Rome 2024Posted 9 months ago
- Application For Maker Faire Rome 2024: Deadline June 20thPosted 11 months ago
- Building a 3D Digital Clock with ArduinoPosted 1 year ago
- Creating a controller for Minecraft with realistic body movements using ArduinoPosted 1 year ago
- Snowflake with ArduinoPosted 1 year ago
- Holographic Christmas TreePosted 1 year ago
- Segstick: Build Your Own Self-Balancing Vehicle in Just 2 Days with ArduinoPosted 1 year ago
- ZSWatch: An Open-Source Smartwatch Project Based on the Zephyr Operating SystemPosted 1 year ago
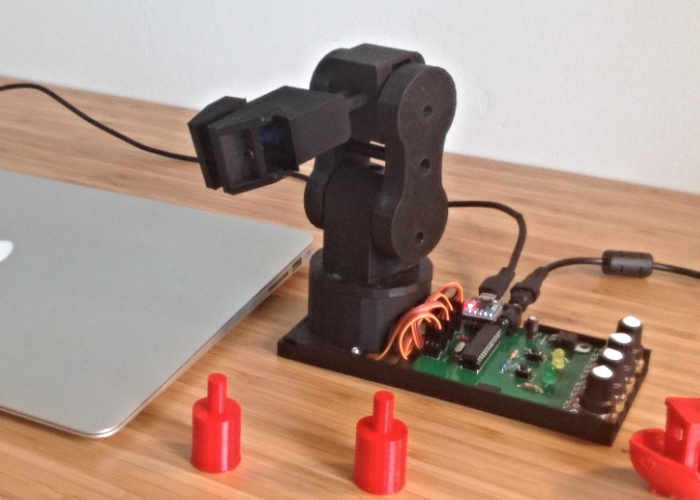
Pedro Petit Robot: 3D Printed Robotic Arm Fun and Safe to Learn

If you are looking to learn more about robotics you may be interested in a new project which is being posted to the Hackaday website, detailing how to build a 3D printed open source robotic arm complete with built in control panel.
Pedro Petit Robot is an Open Source Robotic Arm 4 axes designed in France and fully 3D printed. Pedro Petit Robot is programming with the IDE Arduino, it can catch and move some objects with a high precision. Pedro Petit Robot is fun and safe way to learn for teacher, student, programmer, artist, designer, amateur or even curious to learn the basics of robotics.
Components required to build the robotic arm:
• The servo motor 1 placed at the base of Pedro Petit Robot allows it to rotate 180 degrees on itself giving a very wide field of view of its environment.
• The servo motor 2 placed shoulder level allows it to rotate 180 degrees vertically.
• The actuator 3 the elbow makes it possible to lift objects gripped.
• Servo 4 is Pedro Petit Robot’s gripper which allows it to catch any object in its field of view and move.
Watch the demonstration video below to learn more about the Pedro Petit open source DIY robotic arm


