- How to Adjust X and Y Axis Scale in Arduino Serial Plotter (No Extra Software Needed)Posted 7 months ago
- Elettronici Entusiasti: Inspiring Makers at Maker Faire Rome 2024Posted 7 months ago
- makeITcircular 2024 content launched – Part of Maker Faire Rome 2024Posted 9 months ago
- Application For Maker Faire Rome 2024: Deadline June 20thPosted 11 months ago
- Building a 3D Digital Clock with ArduinoPosted 1 year ago
- Creating a controller for Minecraft with realistic body movements using ArduinoPosted 1 year ago
- Snowflake with ArduinoPosted 1 year ago
- Holographic Christmas TreePosted 1 year ago
- Segstick: Build Your Own Self-Balancing Vehicle in Just 2 Days with ArduinoPosted 1 year ago
- ZSWatch: An Open-Source Smartwatch Project Based on the Zephyr Operating SystemPosted 1 year ago
PCBWay Plug-in button on Kicad
Have you ever thought that when you complete the design on KiCad, you can place an order on pcbway with just one click?
When you click PCBWay Plug-in button on Kicad, we will export these files in your project:
1.Gerber files in correct format for production
2.IPC-Netlist file
3.Bom-file that includes all information of components
4.Pick and Place-file used in assembly
You can click “Save to Cart” to place an order immediately after uploading the files( usually only takes a few seconds), our engineers will double check the files before the production.
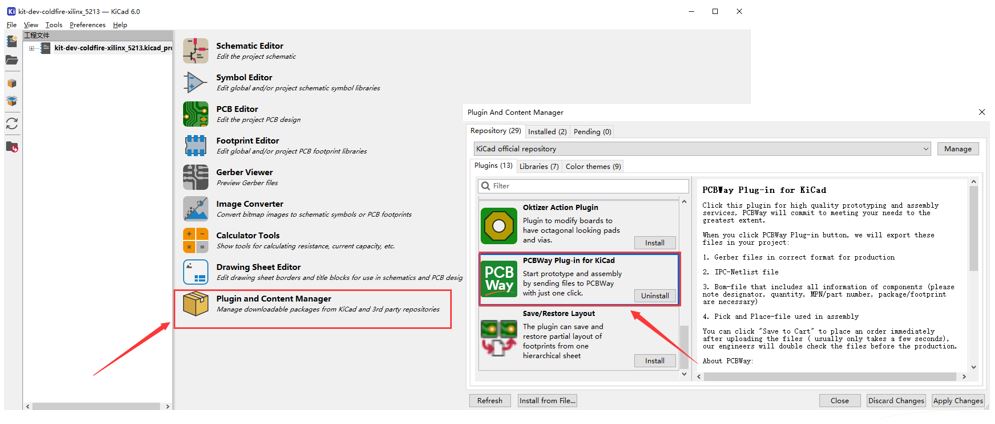
Installation from the official KiCad repositories
Just open the “Plugin and Content Manager” from the KiCad main menu an install the “PCBWay Plug-in for KiCad” plugin from the selection list.
Manual installation
You can also download the latest ZIP file from https://github.com/pcbway/PCBWay-Plug-in-for-Kicad, then open the “Plugin and Content Manager” from the main window of KiCad and install the ZIP file via “Install from File”.
About Bom
We can get all information of components used in your design. In order to speed up the quotation of components, we need this information:
1. Designator (necessary)
2. Quantity (necessary)
3. MPN/Part Number (necessary)
4. Package/Footprint (necessary)
5. Manufacturer (optional)
6. Description/value (optional)
You just need to add the properties in your schematic like the picture shows:
As a sponsor of KiCad, we will always support its development.


One Comment