- How to Adjust X and Y Axis Scale in Arduino Serial Plotter (No Extra Software Needed)Posted 7 months ago
- Elettronici Entusiasti: Inspiring Makers at Maker Faire Rome 2024Posted 7 months ago
- makeITcircular 2024 content launched – Part of Maker Faire Rome 2024Posted 9 months ago
- Application For Maker Faire Rome 2024: Deadline June 20thPosted 11 months ago
- Building a 3D Digital Clock with ArduinoPosted 1 year ago
- Creating a controller for Minecraft with realistic body movements using ArduinoPosted 1 year ago
- Snowflake with ArduinoPosted 1 year ago
- Holographic Christmas TreePosted 1 year ago
- Segstick: Build Your Own Self-Balancing Vehicle in Just 2 Days with ArduinoPosted 1 year ago
- ZSWatch: An Open-Source Smartwatch Project Based on the Zephyr Operating SystemPosted 1 year ago
miniduino USB

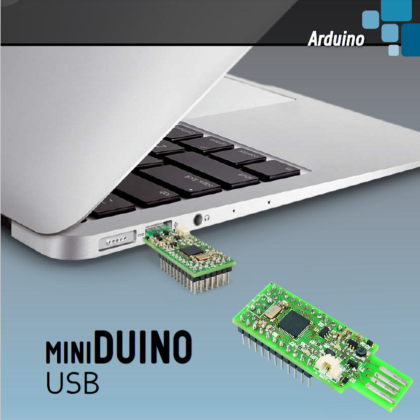
A small Arduino board with minimal hardware but with access to all I/Os, just like the Nano and equipped with PCB-integrated, direct-insertion USB connector: it is basically an Arduino Pen Drive.
Since Arduino had been launched, many derivative products had been “sprouting” on the market, created by numerous companies thanks to the public availability (Arduino is an open-source project) of the electric diagrams for the official boards, used as base to develop any kind of variations; even us, with our Fishino series, have been following the tracks of this prototyping board born in Ivrea and we “stepped into the arena” of derivative products, although while giving something more, as those of you who have read the articles about the Fishino series in the documentation available on fishino site may have noticed.
We recently developed a new Arduino-compatible board that represents the meeting point of two different hardware: the board we are going to describe in this article can be considered as a hybrid of Leonardo and Beetle.
The outcome of our development is, therefore, our miniDuino USB, which name comes from the fact that the most advanced part of the printed circuit is equipped with a direct-insertion USB connector functioning as USB-A connector.
The board is based on the Atmel ATmega32U4 microcontroller, the same one used on the Arduino, Micro, Leonardo boards etc.; it is not a case that the board, once inserted in the USB port of a personal computer, is recognized as Arduino Leonardo, also in virtue of the boot loader written inside it through the ICSP connection.
We chose this microcontroller because it incorporates the USB peripheral, therefore we can upload a sketch without using a USB/TTL converter. Besides, ATmega32U4 can also simulate a keyboard or a mouse, a useful feature in many occasions.
Our miniDuino is very compact in size (19 x 14 x 3.5 mm excluding strips and USB connector). To achieve that, we have optimized the placement of some pins, placing them besides the ICSP connector.
The connector is designed to be placed centrally, just like in the Nano and, beside it, we have moved the GND, CTS, TX and RX pins of the UART serial, in order to shorten the printed circuit as much as possible and decrease the load on the USB connector if the board is inserted in a personal computer port.
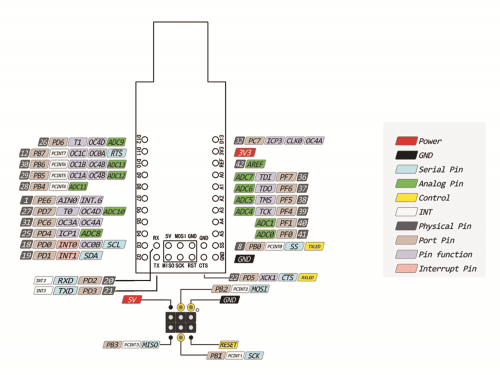
The pins have multiple features; you will find the possible alternative uses in Fig. 1 to make them easier to identify.

Fig. 1
Circuit diagram
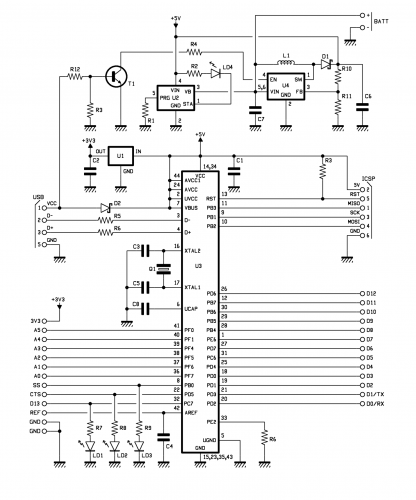
This and more is shown in the circuit diagram for the board, which we are going to analyze below: as you can see, everything is based on the U3 microcontroller, which I/0s are wired outside as disposed of by the Arduino standard. The typical LEDs of Arduino, that is those showing the activity of the serial (LD1 and L3) and the LED for general-purpose applications (LD2) are connected on the PB0 lines (SS. I.e. the Slave Select on the SPI bus), PD5 (CTS of the UART serial) and PC7 (D13 digital I/O).
In the diagram, you can also notice there is no voltage regulator on the input (the 5 V regulator) since it is useless because the board has been designed to be USB-powered and therefore takes advantage of the said connections for the 5 V it needs. However, you can find the two regulators, a boost-type switching DC/DC (centred on U4) and an LD0 (U); the first one has been inserted because, as it appears from the circuit diagram, our board can be powered by a 1s lithium battery (3.C volt nominal), while the second one is used to stabilize the main 5 V voltage on 3.3 V to power the 3V3 pin.
Notice that the microcontroller is powered by 5 V to have the I/Os functioning at 5 V, compatible with the Arduino standard.
The lithium battery is charged whenever the board is inserted in the USB port of the personal computer (or connected to it through a USB-A/USB-A extension cable) or to a USB output charger; clearly, if it is connected to the circuit (there is a dedicated connector on the PCB, on the side next to the pads of the direct-insertion USB connector…) That must not be inserted into a USB port since it would weight down and damage the connection; in this case, the board will be connected through an extension cable. The U2 integrated circuit, the known USB-A/USB-A, is tasked with charging the battery; this is an SMD encased in a SOT-23 case, produced by Microchip, typically accepting 5 V on the input (the range is actually between 3.75 and 6 V), in this case from the USB connector, and provides the output current needed to charge the lithium-ion elements or lithium polymers (LiPo) supplying up to 550 mA. The battery (to be connected to the +/- BAT terminals) can have a theoretically unlimited capacity, because it would charge in a very long time in the best case, however, consider that, with a 550 mA current, a 550 mAh element will charge in one hour, whilst a 1.100 mAh will require 2 hours and one 5,5 Ah element will need 10 hours and so on. The integrated follows the typical configuration, with the STAT output piloting the LD4 LED to admit the status signals we need to understand the charge’s status; to be exact, the STAT output is at logical level low during the charging process, therefore turning on the LED, while it stays at level high when the charging is over and terms of the LD4. STAT is in a high impedance (open) when MCP73831T is in shutdown or there is no battery connected to the VB output. VB (pin 3) is the lithium battery output, which is connected to + and – BA terminals. The integrated circuit charges at stable current and voltage. The charging current (Ireg) can be set through the resistor connected to pin 5 (R1, in our case), which value is dictated by the relation:
Ireg = 1.000/R
Where R is in ohms if Ireg current is expressed in A.
In our case, R is 10 Kohm, therefore, the supplied current is 100 mA.
The charging current value can be changed if you wish to do so (while still respecting the limitations set by the manufacturer) by operating on the R1 resistance.
The DC/DC converter which extracts the 5 V from the battery voltage is connected to the U2’s VB output, so that it can work when powered by the lithium cell; it is a XR1151 by Xysemi, i.e. a switching step-up capable of outputting up to 6 V, powered and the input (VIN and GND) by a voltage ranging from 1.6 and 6 V.
It requires very few external components to work, just a coil (that stores the energy when powered by the internal MOSFET and gives it back to C6 when the transistor is interdicted) and a Schottky diode (D1) that makes the discharge current pass through the inductor. Thanks to the very high commutation frequency (typically 1.2 MHz), the values of L1 and C6 can be very small, thus decreasing the PCB’s encumbrance. The DC/DC is completed by a resistive voltage divider (R10/R11) that, from the switching output, gives back to the (2 A) MOSFET which drain periodically closes the L1 coil to ground through the SW pin, charging it and letting it gives back the stored energy during pause periods, through the pin 1, to the C6 filter capacitor. Voltage brought back to FB pin is used by the error amplifier of the PWM generator to correct duty cycle in proportion to the workload, i.e. increasing it when the generated voltage decreases and vice versa. The ratio between R10 and R11 is such that we can have a stabilized 5 V output, with a maximum current of 800 mA, more than enough to make the entire circuit work and to power possible external devices connected to I/Os and +5V.

talking about the integrated circuit, we have to mention the possibility to put it in power-down (basically shutting it down…) Through the EN pin, with internal pull-up: when this pin is at level high, the DC/DC is working, while if it is forced to logical zero, it turns off, and only its control logic is powered.
Finally, the linear regulator is a MIC5219-3.3YM5-TR, which is an LDO in SMD capable to provide 3,3 V with great stability (we are talking 1% tolerance) and 500 mA maximum current; the drop-out is really minimal, being just around 10 mV with low output currents and increases at just 0,5V at full load.
We end the power section analysis with the D2 Schottky diode we use two separate the USB power from a possible voltage extracted by the U4 DC/DC when the battery is present and charging: when the board is connected to the USB, the 5 V of the USB port reach the +5 V line of the board through D2 and the T1 transistor, with its base polarized through the R12/R3 divider, goes into saturation and its collector drags the U4’s EN terminal to logical zero through R4; this allows to keep the DC/DC off and prevent it from providing 5 V to the circuit, so that we avoid power conflicts that cause damages to the U4 itself or the USB port of the computer to which our Arduino is connected. On that hand, if we unplug the board from the USB, T1 becomes interdicted and allows the internal pull-up resistor of U4’s EN pin to turn on the DC/DC, if a battery is present, which will therefore provide 5 V to the remainder of the board.
When there is no battery the circuit, at least the microcontroller, can be powered through the ICSP when it’s needed to upload the bootloader.

Fig. 2
Using the board
Once our board is complete, you can test it right away by inserting it in a USB port on your computer (without connecting any battery) and checking that the two LEDs closes to the bottom light up.
For a quick test, open Arduino’s IDE, launch the command File>New and write the example code in the window that will pop-up, which is a classic Blink example adapted to the control of the LD1 LED, by defining the instruction digitalWrite on pin 13.
The code to write is as follows:
void setup() {
pinMode(13, OUTPUT);
}
void loop() {
digitalWrite(13, HIGH);
delay(500);
digitalWrite(13, LOW);
delay(500);
}
Then, open the Tools menu and give the command Tab, clicking on Arduino Leonardo on the submenu that will open up.
Now, click on the Check and compile (checkbox) button and, once compiling is done, click on Load (I wrote): if the board works correctly, you will see the LED closest to the battery connector blinking at a frequency of 0.5/0.5 seconds.
This interval derives from the parameter assigned to command delay, which is 500 (milliseconds); try to change value, compile again and re-upload, then you should see the LD1 LED blinking at the frequency corresponding to the time you have entered.
The blinking on the LED in response to the example code proves that your board works correctly and can communicate over USB.
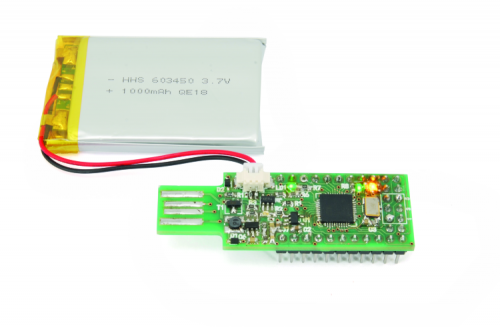
Therefore, you are now ready to use your mini Arduino USB for many different applications. We remind you that for particular applications, the board can be powered by a single cell lithium battery, which is to be connected using the included cable (such batteries are sold with a red-black cable and a two-pole, 2.54 mm female connector) to the main connector provided on the PCB, as is shown in Fig. 3; the battery will recharge whenever the USB is connected to the computer (or to a power charger with USB output) and will power our mini Arduino every time it will be disconnected.

Fig. 3
We conclude by mentioning that, if you wish to do so, you can place the board inside a plastic container (you can use a standard black Teko container) that you will have to modify so that the USB connector on the PCB goes out facing forward and possible pin strips go out through the cover, and to make the LEDs visible.
If you have a 3-D printer, you can also create the container using some clear PLA or PET filament, shaping it however you like, for instance, you can shape it as a USB pen drive.


