- How to Adjust X and Y Axis Scale in Arduino Serial Plotter (No Extra Software Needed)Posted 7 months ago
- Elettronici Entusiasti: Inspiring Makers at Maker Faire Rome 2024Posted 7 months ago
- makeITcircular 2024 content launched – Part of Maker Faire Rome 2024Posted 9 months ago
- Application For Maker Faire Rome 2024: Deadline June 20thPosted 11 months ago
- Building a 3D Digital Clock with ArduinoPosted 1 year ago
- Creating a controller for Minecraft with realistic body movements using ArduinoPosted 1 year ago
- Snowflake with ArduinoPosted 1 year ago
- Holographic Christmas TreePosted 1 year ago
- Segstick: Build Your Own Self-Balancing Vehicle in Just 2 Days with ArduinoPosted 1 year ago
- ZSWatch: An Open-Source Smartwatch Project Based on the Zephyr Operating SystemPosted 1 year ago
Making Your Own Photovoltaic 5V System

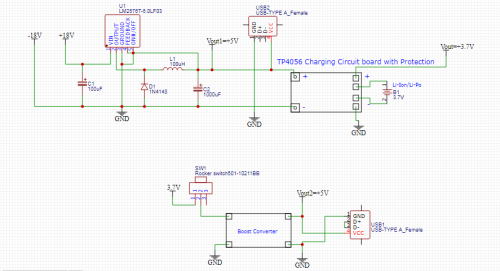
This uses a buck converter as a 5V Output to charge the battery(Li Po/Li-ion). And Boost converter for 3.7V battery to 5V USB output for devices needed 5 V. Similar to the Original system that uses Lead Acid Battery as an energy storage charge by either PWM or MPPT controller. And supply for 12V Devices. This One only uses a Buck converter to convert 12V (solar panel nominal voltage) to stable 5V to charge a Li-Po/Li-ion battery, after daylight. Switch to Boost converter to convert the battery’s voltage 4.2 (3.7 nominal voltage for Li-Po and Li-ion) to again 5V for devices powers 5V. (You can still use the 5V in the Buck Converter during daytime while the Li-Po/Li-ion Battery is charging. It might not be as efficient as the original system(12V). I only did this because my solar panel power is only 15W and not enough budget to buy MPPT or PWM charger for 12V. and not enough to power applications that need higher than 50W. So I make an alternative option, the 5V version.


