- How to Adjust X and Y Axis Scale in Arduino Serial Plotter (No Extra Software Needed)Posted 6 months ago
- Elettronici Entusiasti: Inspiring Makers at Maker Faire Rome 2024Posted 6 months ago
- makeITcircular 2024 content launched – Part of Maker Faire Rome 2024Posted 8 months ago
- Application For Maker Faire Rome 2024: Deadline June 20thPosted 9 months ago
- Building a 3D Digital Clock with ArduinoPosted 1 year ago
- Creating a controller for Minecraft with realistic body movements using ArduinoPosted 1 year ago
- Snowflake with ArduinoPosted 1 year ago
- Holographic Christmas TreePosted 1 year ago
- Segstick: Build Your Own Self-Balancing Vehicle in Just 2 Days with ArduinoPosted 1 year ago
- ZSWatch: An Open-Source Smartwatch Project Based on the Zephyr Operating SystemPosted 1 year ago
How to Integrate LED Matrix Displays in Your Next Project
Whether you’re interested in enhancing model trains, or simply want to hear more about integrating LED matrix displays into your next project, here you have some information you might find interesting.
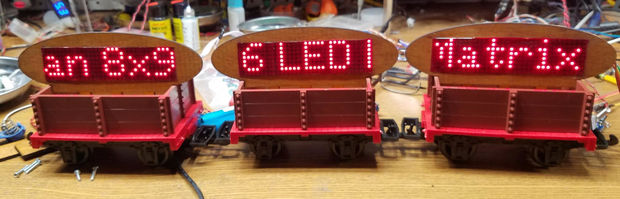
“I have used LED matrix displays for a number of different projects over the last few years. These 8×8 LED units have a controller that allows an Arduino to talk to them sending text or graphic information that can be displayed. These small units can be daisy-chained together to create a long, scrolling display.
While the displays are visually appealing and easy to use they might not get the amount of attention that one would hope they would generate at a train show or other public train display. With this in mind I decided to build an on-board train display using three 8×32 LED boards. Each board is mounted on a car with the three connected together to create one long scrolling message board. To make things even more interesting and compelling to visitors the display’s message can be changed remotely with a cell phone or computer.”
In order to make his model trains stand out, David G. Bodnar has been working on the best way to integrate 8×8 displays into the cars.
Through the process he’s come up with several great techniques, including a red filter to help them “pop,” as well as wiring things in such a way that sets of LEDs can be used on either side to show the same message.
An Arduino Pro Mini and Nano are used for control, while a Bluetooth module with an Android terminal program enables him to change the text remotely.
Further information are available on David’s instructables page.

Related Posts


-
 Arduino ISP (In System Programming) and stand-alone circuits
We use an Arduino to program other ATmega without...
- Posted 13 years ago
-

-

-
 GSM GPS shield for Arduino
Shield for Arduino designed and based on the module...
- Posted 13 years ago
-
 Small Breakout for SIM900 GSM Module
Some post ago we presented a PCB to mount...
- Posted 14 years ago
-
 How to Control NeoPixel Installations via Wi-Fi Using Fishino and NodeMCU with Python
We create NeoPixel light installations with Fishino and NodeMCU...
- Posted 4 months ago
-
 How to Adjust X and Y Axis Scale in Arduino Serial Plotter (No Extra Software Needed)
The Serial Plotter in Arduino is an excellent tool...
- Posted 6 months ago
-
 Elettronici Entusiasti: Inspiring Makers at Maker Faire Rome 2024
Maker Faire Rome 2024 is ready to amaze the...
- Posted 6 months ago
-
 makeITcircular 2024 content launched – Part of Maker Faire Rome 2024
Applications to MakeITcircular must be in by October 3,...
- Posted 8 months ago
-
 SONY color camera module, 700 TV Lines
Color camera module equipped with a 1/3″ CCD sensor...
- Posted 8 months ago