- How to Adjust X and Y Axis Scale in Arduino Serial Plotter (No Extra Software Needed)Posted 2 months ago
- Elettronici Entusiasti: Inspiring Makers at Maker Faire Rome 2024Posted 2 months ago
- makeITcircular 2024 content launched – Part of Maker Faire Rome 2024Posted 5 months ago
- Application For Maker Faire Rome 2024: Deadline June 20thPosted 6 months ago
- Building a 3D Digital Clock with ArduinoPosted 11 months ago
- Creating a controller for Minecraft with realistic body movements using ArduinoPosted 12 months ago
- Snowflake with ArduinoPosted 12 months ago
- Holographic Christmas TreePosted 12 months ago
- Segstick: Build Your Own Self-Balancing Vehicle in Just 2 Days with ArduinoPosted 1 year ago
- ZSWatch: An Open-Source Smartwatch Project Based on the Zephyr Operating SystemPosted 1 year ago
Embedded MP3 Player & Recorder: How it works
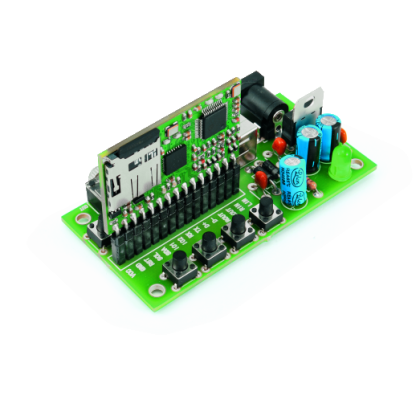 The operation principle of this circuit is very simple and easy to describe. The basic idea consists in supplying a device that is capable of operating since it is first started: this is why we created a software, in order to automatically generate a preset configuration file, with default values, that can be modified at a later stage by the user, as desired. To use the circuit, it is therefore enough to supply power to pins 1 and 2, to connect a pair of headphones to pins 12 and 13, and to copy some music tracks onto the microSD. To operate with the circuit it is enough to interact with a terminal emulator and to send the suitable commands, as shown in the next paragraphs. The circuit will allow to reproduce: in a programmed manner or on demand, the music tracks that are on the microSD or, as an alternative, and always with the same interaction methodology, it will be possible to record and possibly hear again all the sounds coming from the Line-In analog input.
The mode with which to interact can be configured and considers three macro groupings: to send commands by means of a serial connection (native UART or USB), to interact with programmable logical signals and to interact with the reading and writing of dedicated registries via I²C.
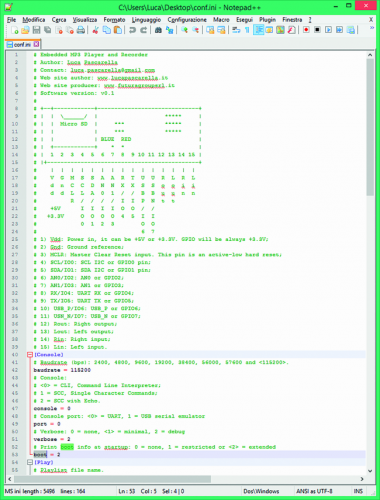
In figure a sample fragment of the configuration file, automatically generated by the software, is shown; the initialization file (typically, with .ini extension) is a text file format, used to create key-value associations.
The format, adopted since Windows 95, is typically divided in sections, characterized by labels put between square brackets (for example [Volume]); coming with the section are there the key-value pairs, generically the parameters are divided by a sign of ‘=’ from the arguments.
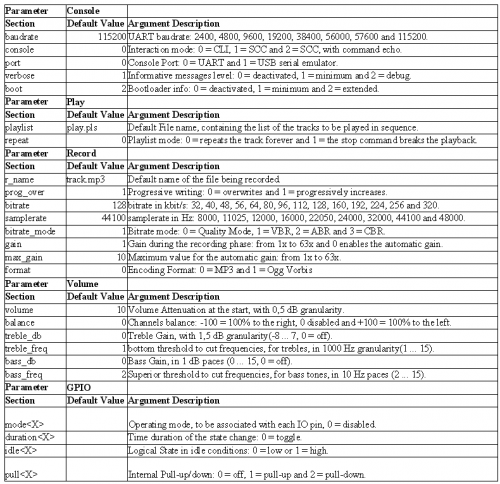
The lines starting with ‘#’ or with ‘;’are comments and are simply ignored by the parser. To edit the configuration file we are interested in, it is enough to use any text editor program, but we advice to use Notepad++ for Windows, since it has the highlight text function, that turns out to be useful when locating at a glance certain sections, certain parameters or certain comments. In table all the items (along with the relative description) that are present in the conf.ini file can be found, and that the user may set up, according to his exigencies.
Representation of the sections and of the parameters of the conf.ini file.
When developing the MP3 player and recorder’s software, we focused on the operative aspects, by trying to implement the greatest number of usage cases that we imagined. When realizing the single scenarios, we thought to make the circuit use easier, by allowing to customize the functionalities that have been considered, by means of the usage of a text-format configuration file, in addition to implementing a Unix like Shell , named Command Line Interpreter (CLI), so to dynamically interact with the device functions.
The use of a command line to insert parameters or operations surely makes it easier for the purpose of an interactive usage by a human user, but it can be boring in the case in which you want to use the circuit automatically, relative to another CPU: that is why we considered a third interaction mode, named Single Character Commands (SCC), that allows to give sequences of commands in a much more compact way. As an alternative to these two serial interaction forms, another even more elementary approach can be used and it is named IO general purpose: it is based on the variation of the logic signals between 0 V and 3,3 V, or vice versa. To select an interaction mode and make it permanent, it is necessary to modify the configuration file named conf.ini, as described in the IO general purpose paragraph.
The conf.ini file contains all the parameter-argument pairs, modifiable by the user, and some short descriptions associated with each one of the previous modifiable parameters. Moreover, to prevent the loss of a valid configuration, the software automatically sees to the creation of a backup copy of the last valid configuration, the dump file will take the conf.dmp name.
Moreover, in the case in which the conf.ini file turns out to be corrupted for some accidental reasons, the software will be using the backup copy to recover the lost parameters. If, for some reasons, even the backup copy turns out to be corrupted, the software will then generate again a new default configuration, in an automatic way.
Since the microSD was designated as the main archive system, it is good to explain that the software is capable to correctly manage memories that have been formatted in FAT12, FAT16 and FAT32, though for obvious size reasons we advice to use the FAT32 File System. The maximum size we tried was 32 Gb, formatted in FAT32. Moreover, the software has no limitations as regards the names and file hierarchies, and in fact it can manage files with long names, named Long filename (LFN), even if arranged in subfolders.
Finally, to obtain some good performances in the recording phase, it is adviceable to use some very fast microSD, like those of speed class 4 or 10. Otherwise, it will be impossible to record a MP3 stream with a high bitrate and samplerate, without losing some fragments in the audio stream. The only software limitation, still present in the v0.1 version, regards the use of white spaces in the names of files or folders: to allow a proper operation, the use of the ‘ ’ character, that is, the white space, should be avoided and maybe substituted with ‘_’ (underscore).
To rapidly use our circuit, we propose a rapid overview of all the commands that can be given in CLI mode, that is to say, with an interaction via command line. That is why we advice to use, as a terminal emulator, the famous PuTTY program.
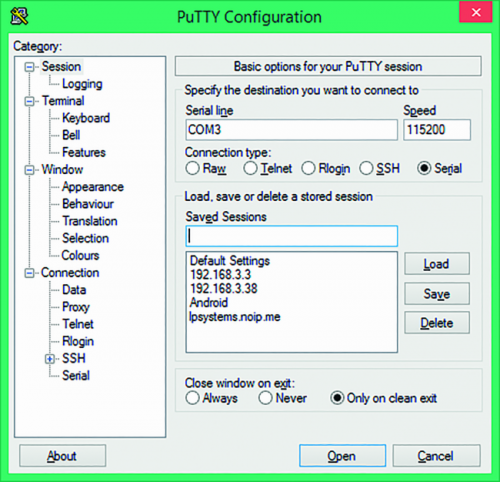
This last one will have to be configured to access the device in a serial way. The reproducer’s software has been created to allow, in a mutually exclusive way, the use of the CLI or SCC modes via native UART, or via USB Serial Emulator. Thus, to interact with the reproducer via PuTTY, it is needed to connect the circuit to the PC and there are two alternatives: the first solution implies the use of a serial USB converter, or of a RS232 TTL converter, by connecting it to the serial port of the reproducer; from PuTTY it is needed to set up the program. In the case in which the conf.ini file hasn’t undergone modifications, the firmware will enable the commands in CLI mode on native UART (7 RX and 8 TX pins, with 115200 bps baud rate).
As it can be seen, it is necessary to select the Connection type: Serial to set up the Speed parameter at 115200 and to select the Serial line that has been associated with the desired PC serial port (RS232 or the USB serial converter); for the Windows users it is possible to know the list of the serial peripherals, named COMx, by operating from the control panel, then selecting the device manager at the Ports (COM and LPT) entry.
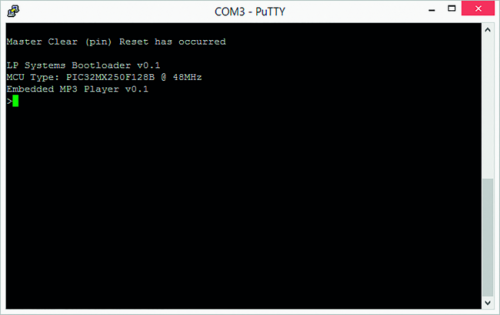
Once the connection with the device has been established, on the interaction window of the PuTTY emulator, a list of strings will appear at the start. They represent the result of the boot process, and can be disabled by setting the value of the boot feature to ‘0’ in the conf.ini file. At this stage the ‘>’ symbol will indicate that the device is ready to receive a command. For example, by typing in ‘ls’, followed by the enter button, you will obtain a list of the files that can be found in the current directory. To know the list of the available commands, you just need to type in ‘help’, followed by the command name; thus for example ‘help ls’ will print the details concerning the usage of the list command.
To easily type in a command or a file name, and leaving the burden of the autocomplete to the software, you just need, for example, to type in the first characters of the command and press the tab button. For example, ‘pl’ followed by the tab button will automatically complete the command, or in the case of more commands with the same prefix, it will print the list of the available commands. Similarly, to insert the name of a file it will be sufficient to press tab after the name of the command, followed by a white space. For example, by typing in ‘play <tab>’ you will obtain the list of the files that can be found in the current directory, or if there is a single file with that specific prefix, the software will automatically complete it with the whole name of the file.
For example, if in the current directory a file of the my_favourite_track.mp3 kind is there, and you type in the ‘play my’ command, and then press ‘play my’, as a result you will obtain the automatic typing in of the file name on the command line.
At this stage we may present an overview of the commands that are available in CLI mode. Each command can be used one by one, or with optional parameters: these last ones will be indicated between the bracket symbols ‘[’ and ‘]’ so to show that the argument is optional. Finally we remind that, as in a real linux shell, by pressing the arrow keys the appropriate commands will be generated. For example, with the left and right arrows it is possible to move the cursor, while the use of the up arrow will recall the last command typed in.

Representation of the commands being accepted in CLI mode.
Examples of commands in CLI mode
In the previous paragraphs we saw the list of the available commands, in this section we will focus on some examples of more common use. In each of the following examples we will imagine that the verbose value is set to 2 (debug mode) in the conf.ini file.
Listing 1
The first example consists in starting the playback of a certain musical track, to set the volume and to stop the execution.
 >play my_track.mp3<enter>
 File opened successfully
 >vol<enter>Volume: -5.0dB balance: 0
 Left: 10pt
 Right: 10pt>vol 15<enter>
 >stop<enter>
 Finish playing
 Try to close file
 File closed successfully
Listing 2
The second example consists in the execution of a playlist, in the setting of the bass tones and the termination of the playlist.
 >playlist playlist.pls<enter>
 Try to open playlist: playlist.pls
 Playlist opened successfully
 Playlist execute: test1.mp3Try to open: test1.mp3
 File opened successfully
 >bass<enter>Bass enhancement: 0dB @ 20Hz>bass 7 10<enter>
 >stop
 Finish playing
 Try to close file
 File closed successfully
 Playlist ended
Listing 3
The next example will show: the use of the help command, the use of the pause, the creation of a folder with relative navigation.
 >help<enter
 >bass
 […]
 verboseversionvol
 >pause<enter>
 Pause: ON
 >pause<enter>
 Pause: OFF
 >pause 1000<enter>
 Pause for 1000 ms
 >mkdir testDir
 >ls -la<enter>
 -drw    0.0   Byte  9/34/2062   0:7     .
 -drw    0.0   Byte  9/34/2062   0:7     ..
 -drw    0.0   Byte  9/34/2062   0:7     testDir
 Total: 3
 >cd testDir<enter>
 >cd /<enter>
Listing 4
The last example shows how to know the current firmware version, and how to upgrade it to a following version, at a later stage, by loading the new firmware in the microSD. We have to point out that the firmware is composed by two distinct projects: the bootloader, that is installed in the Flash section, dedicated to the boot, and that may happen exclusively with a programmer: for example, the In-Circuit Debugger (MPLAB ICD 3), by interacting with the appropriate IO pins that are on the pin connector; and by the out-and-out project. This last one may be loaded at once, along with the bootloader from the ICD3, or may be loaded/updated at a later stage by the same bootloader. To start an update, it is needed to insert the firmware in the microSD and to send the flash command, the file containing the new software will have to be exclusively inserted in the root of the microSD and to be renamed exactly as image.hex.
 >versione<enter>
 LP Systems Bootloader v0.2
 MCU Type: PIC32MX250F128B @ 50MHz
 Embedded MP3 Player v0.1
 >flash 0xAA996655<enter>
 Entering in bootloader mode to flash new image.
 Send trigger signal to start firmware upgrade.
. |
General purpose I/O
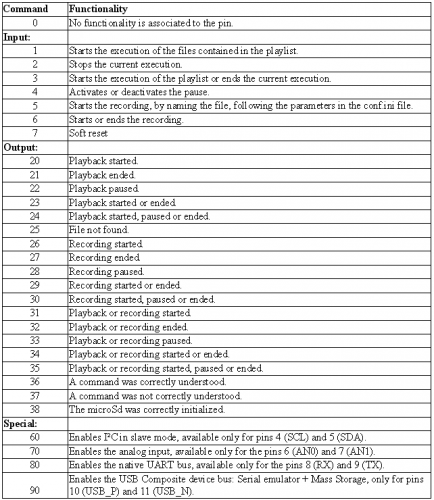
In the previous paragraphs we hinted at the possibility to configure each of the eight IO pins individually, with a specific functionality. Below we will see how to configure the conf.ini file, so to make the modifications permanent, or to try them via the ‘gpio’ command. Table synthetizes the functionality that is possible to associate to each pin. To temporarily test a functionality it is possible to use the ‘gpio’ command; this last one, if left without parameters gives the current configuration, vice versa with the appropriate parameters it allows to modify the functionality. The first command parameter is ‘n’, and refers to the I/O number to be modified, it will be a value between 0 and 7; the following parameter is ‘m’, and refers to the functionality, and is a numeric value to be chosen, ‘0’ doesn’t correspond to any functionality, all the other values allow to associate a specific functionality to the said I/O; the third parameter is ‘d’ and corresponds to the duration of the digital signal, in case of input functionality it indicates the minimum time needed to validate the signal variation, in the case the I/O was set as output it indicates the time interval during which the signal will change its state. In the case in which the value is set to ‘0’, the current logic state will be permanently modified by inverting the last logic condition.
The fourth parameter is ‘i’ serves to set the idle state, that is to say the value that, for both input and output, is considered as idle state. Finally, the last parameter is ‘p’ and serves to enable the internal pull-up or pull-down. In this case ‘0’ disables the functionality, ‘1’ enables the pull-up and ‘2’ enables the pull-down. Similarly to what we described for the temporarily variations (via the ‘gpio’ command) it is possible to obtain the permanent dual by interacting with the relative parameters of the conf.ini file, in particular by setting the following parameters: mode<X>, duration<X>, idle<X> and pull<X>; even in this case the X represents the I/O number involved and will be a value between 0 and 7.
Description of the functions that can be associated to the programmable IO of the microcontroller.
Conclusions
We conclude this article by anticipating that in the next episode we will continue the presentation of the MP3 player and recorder, by describing the SCC and I²C operating modes, as well as the developed software. Moreover, we invite all the readers to always check for the availability of the last software version, in order to always have the updated list of the new commands.




One Comment