- How to Adjust X and Y Axis Scale in Arduino Serial Plotter (No Extra Software Needed)Posted 3 months ago
- Elettronici Entusiasti: Inspiring Makers at Maker Faire Rome 2024Posted 3 months ago
- makeITcircular 2024 content launched – Part of Maker Faire Rome 2024Posted 5 months ago
- Application For Maker Faire Rome 2024: Deadline June 20thPosted 7 months ago
- Building a 3D Digital Clock with ArduinoPosted 12 months ago
- Creating a controller for Minecraft with realistic body movements using ArduinoPosted 12 months ago
- Snowflake with ArduinoPosted 1 year ago
- Holographic Christmas TreePosted 1 year ago
- Segstick: Build Your Own Self-Balancing Vehicle in Just 2 Days with ArduinoPosted 1 year ago
- ZSWatch: An Open-Source Smartwatch Project Based on the Zephyr Operating SystemPosted 1 year ago
A Great I/O expansion Shield for RaspberryPi based on I2C
Today we introduce a I/O expansion shield for Raspberry Pi which allows you to extend the number of digital inputs and outputs available for our applications. [See also our previous I/O expander for Arduino]
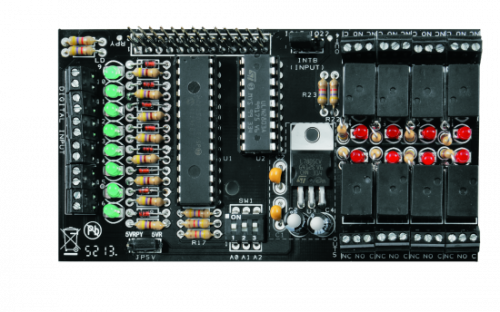
After having published the LCD display and GSM expansion shield we add to the collection a new shield, based on the MCP23017, which allows you to increase the number of digital inputs/outputs to be used by your applications. This I/O Expansion shield provides eight inputs and eight digital outputs. On the eight inputs, LEDs show the status of visually. Each of the eight digital outputs pilots a relay which can be connected to external loads. Also on each output is an LED that makes visible the state.
To access the I/O shield you take advantage of the I2C bus. The address of the shield is customizable via a DIP switch with three positions. In this way, up to eight shield can be simultaneously used, each with a different address, for a total of 64 inputs and 64 outputs individually drivable. In this article we present also the Open Source Wiring-PI library, a Python library for licensed under GNU LGPLv3, which allows access to individual inputs and drive it very easier. Recall that the expansion shield presented in this article coexists peacefully with the other shield that we have presented, and also with those of third parties on the market. A wealth of connectivity options that allows for the creation of applications that can handle even highly complex environments. The implementation of such applications requires a quantum leap compared to what we have presented so far. Mainly it’s because is necessary to design and implement software architectures that are able to decouple the use of external devices from processing modules themselves. In particular, we must build programs that can respond to “events” generated by external inputs from the sensors connected to them, which occur asynchronously. It is also necessary to properly design the programs to manage devices that are attached to the same communication resources. For example, several applications may want access to different devices, but using the same I2C bus. This is the case of the expansion shield we present in this article.
If an application already uses the bus, to read or write the state of an I/O’s it controls, other applications that require to bind the same bus to manage the I/O pertaining to them, finding it busy can not do anything but go wrong. The first solution that might come to mind is to make one huge application that manages all the features in a monolithic way, a bit ‘like a huge microcontroller. It’s intuitive, by the way, that this approach leads to more negative than positive aspects: application rigidity, complex design, construction, maintenance and renovation, difficulty in timing between the different parts, fragility (if a party, even insignificant, it must be in error falls throughout the application). To resolve a need for this type of application, seek architectures that can support concurrent applications collaborating and managing communications between the different actors, based on that orchestrate the use of server resources to be shared and where the different application requirements must be implemented as clients that require the use of resources “centralized” by requests based on shared protocols. There are many possible alternatives, TCP / IP sockets, functionality, databases, flat files, and so on. The important thing is that the communication mechanisms are able to properly manage the phenomenon, such as generating code or managing “semaphores” to properly coordinate client requests. Clients, finally, when need to access a centrally managed resource, must avoid direct accessed but use the default communication channel for that resource with the protocol and the procedures laid down. In summary, in the world of embedded design does not have to be paid to the individual application, but must take into account the architecture that you want to accomplish as a whole.
Circuit diagram
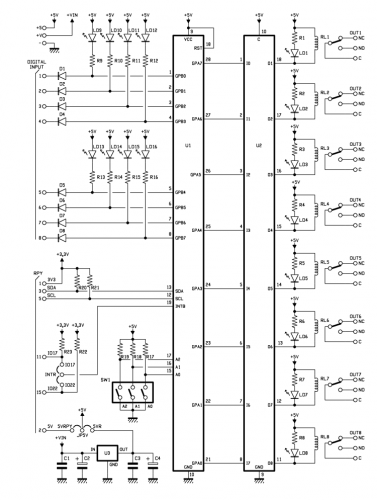
The circuit is designed around the MCP23017 integrated circuit, from Microchip, offering 16 inputs / outputs that can be driven through the I2C bus. In this way, we can drive the eight inputs and eight digital outputs of our shield engaging the only two pins of the Raspberry Pi connector headed to the I2C bus. Obviously the bus is not used exclusively by our shield, but you can connect other devices, of course configured with different addresses.
Wiring diagram, parts list, mounting plan
MCP23017 provides 16 I/O divided into two banks of eight lines each called GPA and GPB. Each line of the IC is individually configurable as an input or output. In our shield the bench GPA is entirely dedicated to the management of the outputs with relays while the tour GPB is dedicated to the management of the digital inputs. The lines of digital output from the integrated bank GPA MCP23017 are connected to the input pin of the IC U2, a ULN2803, specially designed to drive inductive loads such as relay coils. Inside the IC there are eight darlington transistor stages with emitters in common, and an output current up to 500mA. The inputs 1-8, characterized by a high input impedance, can be driven directly from the ports of the I / O of a microcontroller or integrated as the MCP23017.
The digital inputs are headed to the pins of GPB the bank the IC. The pull-up resistances maintain the high level input. The diode serve to protect input of the IC, limiting the maximum voltage that can arrive at the input pin to 5V. All digital inputs have a common ground, which corresponds to a negative power supply; negative and positive are also present on a double contact of the terminal, so as to have easily available to 5V with which you can supply power to the external circuits. The shield requires an external power supply with a voltage between 9 and 12V, as opposed to a separate Raspberry Pi, since the 5V output of the latter is not able to provide the current needed to power the shield . The shield, however, is capable of powering the Raspberry Pi. If you want to keep the powers of the shield and the Raspberry Pi board separated, JP5V jumper must be placed between the center pin and the pin 5VR. To ensure that the shield power supply also supplies the Raspberry Pi board, the JP5V jumper must be placed between the center pin and the pin 5VRPY.
INTB output, which allows you to manage the interrupt inputs coming from the GPB bank can be connected, by means of the INTR jumper, to RaspberryPi’s GPIO22 or GPIO17, so as to make it available to applications. The Dip Switch connected to pins A0, A1 and A2 of the integrated, allows you to set the I2C address to be assigned to the integrated.
The possibility of “packaging” is the fact that the MCP23017 integrated is connected to Raspberry Pi GPIO only with the needed pins for I2C communication and for the eventual power. All other Raspberry Pi pins are just passers-by.
BOM
R1: 470 ohm
R2: 470 ohm
R3: 470 ohm
R4: 470 ohm
R5: 470 ohm
R6: 470 ohm
R7: 470 ohm
R8: 470 ohm
R9: 470 ohm
R10: 470 ohm
R11: 470 ohm
R12: 470 ohm
R13: 470 ohm
R14: 470 ohm
R15: 470 ohm
R16: 470 ohm
R17: 4,7 kohm
R18: 4,7 kohm
R19: 4,7 kohm
R20: 4,7 kohm
R21: 4,7 kohm
R22: 4,7 kohm
R23: 4,7 kohm
C1: 100 nF
C2: 100 nF
C3: 100 µF 16 VL
C4: 100 µF 16 VL
D1: 1N4148
D2: 1N4148
D3: 1N4148
D4: 1N4148
D5: 1N4148
D6: 1N4148
D7: 1N4148
D8: 1N4148
LD1: LED 3 mm red
LD2: LED 3 mm red
LD3: LED 3 mm red
LD4: LED 3 mm red
LD5: LED 3 mm red
LD6: LED 3 mm red
LD7: LED 3 mm red
LD8: LED 3 mm red
LD9: LED 3 mm green
LD10: LED 3 mm green
LD11: LED 3 mm green
LD12: LED 3 mm green
LD13: LED 3 mm verde
LD14: LED 3 mm green
LD15: LED 3 mm verde
LD16: LED 3 mm verde
SW1: Dip-Switch 3
RL1: Relé 5V
RL2: Relé 5V
RL3: Relé 5V
RL4: Relé 5V
RL5: Relé 5V
RL6: Relé 5V
RL7: Relé 5V
RL8: Relé 5V
U1: MCP23017-E/SP
U2: ULN2803
U3: 7805
Practical usage of the shield
Let’s connect the shield to the Raspberry Pi board, paying attention to the matching pins on their connectors, and check that the bottom of the shield should not be connected with the USB connectors or Ethernet. In case of doubt, we can protect the plug connectors with electrical tape. Then we connect a 9V DC power to the power terminals of the shield (V + and -) and give power to the Raspberry board. We connect peripherals, network and power to the Raspberry Pi in the usual way … and let tension go.
To communicate with the MCP23017 integrated you need to use the I2C bus and, as a result, we have enable the management I2C bus module that is disabled in the default installation of Raspbian.
This operation is not a problem but maybe tricky for those who are new to the Raspbian environment: in the article tough we describe only specific operations to use the shield of I / O.
Let’s recall that for the other posts in the blog that are dedicated to the Raspberry Pi, we adopted the constantly updating operating system called Raspbian and SSH remote management called Putty (or Kitty) and WinSCP.
Therefore we place all DIP switches for addressing the shield on the “ON” position (GND), the JP5V jumper in 5VR position (separate power supply), mount the shield on the Raspberry Pi connector, we perform all connections and give power. No smoke? Well, we are already well under way.
Now we need to enable the driver to manage the I2C bus, install the python library for the management of the MCP23017 and realize the first programs to see that everything is working properly. Let us recall briefly the process to update the operating system and enable the driver for the I2C bus. First, we use Putty to open a terminal window, then we log with the “root” user and type the commands needed to update the packages database of the operating system:
apt-get update
apt-get upgrade
… To revive and bring to use the management module of the I2C bus you need to add it to the set of modules known to the kernel.
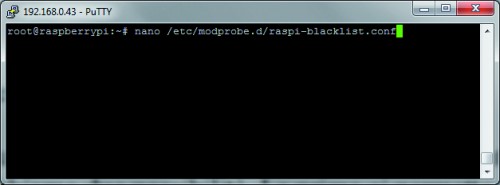
Open the configuration file that contains the list of blacklisted modules (obscured), with the command:
nano /etc/modprobe.d/raspi-blacklist.conf
Nano is a minimalist text editor that runs on the terminal.
Eliminate the I2C module from the blacklist erasing the line or by commenting with a “#”.
Press Ctrl-X and then Y to to save the file after editing. Perform a reboot for changes to take effect.
Now we must make sure that the module is loaded and becomes an integral part of the kernel. To do this, we have two possibilities. The first allows us to load the module on command, and is valid for the entire time in which RaspberryPi remains on (at next boot the modules must be reloaded by the command). The second option allows us to load the module automatically at operating system boot, and make it immediately available to applications, which is essential in a server system that runs unattended.
The first option requires the use of modprobe. We type:
modprobe i2c-dev
We can see the success of the activation of the driver with the command that displays the list of all installed modules :
lsmod
Since in Linux everything (or almost) is a file if we go to /dev files we can see the connection to the device and i2c i2c-0 -1.
The remove option of the modprobe command can be used to disable a module previously loaded.
Modprobe-r i2c-dev
If you want the i2c-dev module to be loaded at RaspberryPi boot you must enable the permanent loading, which is realized by modifying the configuration file /etc/modules, which contains the list of drivers to load at boot time.
To edit the file, we can use the control:
nano /etc /modules
and add a new line to the configuration file that contains:
i2c-dev
Press Ctrl x and then y to save changes to the file and exit.
Now install the i2c-tools package that provides a number of functions you can use by command line to verify the operation of the bus i2c, not before, as always, that you update the list of packages in the distribution with the command:
apt-get update
continue with:
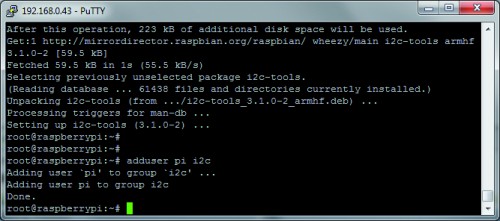
apt-get install i2c-tools
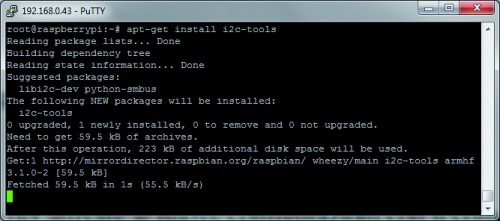
Add our user to the i2c group:
adduser pi i2c
Now perform RaspberryPi reboot to activate the new configuration with the command
reboot
after RaspberryPi has restarted, you are reconnected with Putty and, if necessary, check with the modprobe i2c-dev command, if the integrated circuit is visible on the I2C bus with the command
i2cdetect -y 0 per RaspberryPi rev. 1 or
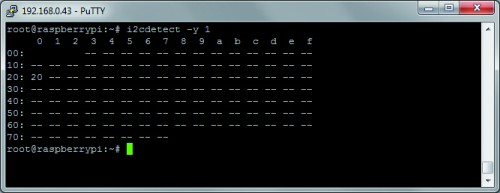
i2cdetect -y 1 per RaspberryPi rev. 2
You will need to obtain a result similar to that shown in figure where the address 0x20 identifies the MCP23017.
Now it’s time to install the library for the management of the MCP23017.
We opted for the wiringpi2 library, an excellent management system for Raspberry Pi GPIO written in C by Gordon ‘Drogon’ Henderson and “adapted” to be used with the Python language by Phil ‘Gadgetoid’Howard. This library is distributed under GNU LGPLv3, and includes several modules, for use with specific ICs using the I2C and SPI buses. One of these is the MCP23017, used in our shield.
The approach adopted in the library, is to assign a numeric reference to each pin of the input/output of the IC. Numbering starts from a defined number at will, making it possible to use more than one IC on the same board, each with a pin range defined by a different range of numbers. As we will soon see we have a range of numbers assigned to the pins of the IC that take values from 65 – GPA0 pin – to 80 – for GPB7 pin.
Before describing some examples of using the library let’s install it.
Wiringpi2 is available as a add-on “package” to the Python language. To manage the packages we need the Python package manager “pip”. Pip is a recursive acronym that stands for “Pip Installs Python”. Then we install the “pip” package and then the “wiringpi2” library.
We update the list of new distribution’s package with the command:
apt-get update
We install the dependencies required by the pip package:
apt-get install python-dev
and finally the pip package itself:
apt-get install python-pip
Now we can install the library itself using the package manager pip:
pip install wiringpi2
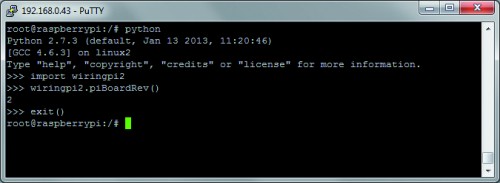
After this process, we can immediately check if everything worked properly. Open the Python interpreter command line, simply typing “python” at the prompt of the terminal window and verify the correct installation of the library wiringpi2 by typing:
import wiringpi2
wiringpi2.piBoardRev()
The response including the version of the library confirms that everything works properly.
Now we use the library to create some sample program. The first program, which is visible in Listing 1, allows you to attach each input pin of the integrated GPA, to the corresponding output pin of the GPB. The comments should not leave doubts about the logic of the program, we describe only the instructions “try: – except”, introduced for the first time in our posts.
These instructions allow you to “trap” errors. If we include a set of instructions within a “try” (test) group, if an error occurs, the program, instead of interrupting the execution, traps the error and triggers the instruction contained within the group “except: “. In this group, in our case, we have included the necessary instructions to reset all the integrated circuit pin configured as input. This mechanism works even when you stop the main loop of the program with CTRL-c. To test the program, we can connect the buttons between the ground and each input pin of the shield. Alternatively we can connect one end of a jumper cable to the ground terminal and, with the other terminal, touch the connectors of the input terminals. With the WinSCP tool we can copy the program in Listing 1 into one of the Raspberry Pi folders inside the /home directory, for example relays. We give a name to the program, for example, “relay-test.py”. Posizioniamoci in the / home folder and launch the program with the command:
python relay-test.py
Now with the buttons or with the end of the jumper, we can bring the inputs of the shield to ground and see how the LEDs light up and the corresponding relay outputs close, for all the time during which the input is connected to ground. To end the program we CTRL-x.
Listing 1
#!/usr/bin/python


# rele_test.py


import wiringpi2 as wiringpi  # imports wiringpi2 librery

from time import sleep

pin_base = 65       # sets pins enumeration starting from 65

i2c_addr = 0x20     # adress obtained with A0, A1, A2 to GND

wiringpi.wiringPiSetup()                    # initializes wiringpi2  librery

wiringpi.mcp23017Setup(pin_base,i2c_addr)   # sets i2c  pin e indirizzo

wiringpi.pinMode(65, 1)         # sets GPA0 as output

wiringpi.digitalWrite(65, 0)    # sets GPA0 as 0 (0V, off)

wiringpi.pinMode(66, 1)         # sets GPA1 as output

wiringpi.digitalWrite(66, 0)    # sets GPA1 as 0 (0V, off)

wiringpi.pinMode(67, 1)         # sets GPA2 as output

wiringpi.digitalWrite(67, 0)    # sets GPA2 as 0 (0V, off)

wiringpi.pinMode(68, 1)         # sets GPA3 as output

wiringpi.digitalWrite(68, 0)    # sets GPA3 as 0 (0V, off)

wiringpi.pinMode(69, 1)         # sets GPA4 as output

wiringpi.digitalWrite(69, 0)    # sets GPA4 as 0 (0V, off)

wiringpi.pinMode(70, 1)         # sets GPA5 as output

wiringpi.digitalWrite(70, 0)    # sets GPA5 as 0 (0V, off)

wiringpi.pinMode(71, 1)         # sets GPA6 as output

wiringpi.digitalWrite(71, 0)    # sets GPA6 as 0 (0V, off)

wiringpi.pinMode(72, 1)         # sets GPA7 as output

wiringpi.digitalWrite(72, 0)    # sets GPA7 as 0 (0V, off)

wiringpi.pinMode(73, 0)         # sets GPB0 as input

wiringpi.pullUpDnControl(73, 0) # internal pull-up and pull-down deactivated

wiringpi.pinMode(74, 0)         # sets GPB1 as input

wiringpi.pullUpDnControl(74, 0) # internal pull-up and pull-down deactivated

wiringpi.pinMode(75, 0)         # sets GPB2 as input

wiringpi.pullUpDnControl(75, 0) # internal pull-up and pull-down deactivated

wiringpi.pinMode(76, 0)         # sets GPB3 as input

wiringpi.pullUpDnControl(76, 0) # internal pull-up and pull-down deactivated

wiringpi.pinMode(77, 0)         # sets GPB4 as input

wiringpi.pullUpDnControl(77, 0) # internal pull-up and pull-down deactivated

wiringpi.pinMode(78, 0)         # sets GPB5 as input

wiringpi.pullUpDnControl(78, 0) # internal pull-up and pull-down deactivated

wiringpi.pinMode(79, 0)         # sets GPB6 as input

wiringpi.pullUpDnControl(79, 0) # internal pull-up and pull-down deactivated

wiringpi.pinMode(80, 0)         # sets GPB7 as input

wiringpi.pullUpDnControl(80, 0) # internal pull-up and pull-down deactivated

try:

while True:

if not wiringpi.digitalRead(73): # inverted logig(external pull-up)

wiringpi.digitalWrite(65, 1)  # sets GPA1 as 1 (3V3, on)

else:

wiringpi.digitalWrite(65, 0)  # sets GPA1 as 0 (0V, off)


if not wiringpi.digitalRead(74):

wiringpi.digitalWrite(66, 1)

else:

wiringpi.digitalWrite(66, 0)


if not wiringpi.digitalRead(75):

wiringpi.digitalWrite(67, 1)

else:

wiringpi.digitalWrite(67, 0)


if not wiringpi.digitalRead(76):

wiringpi.digitalWrite(68, 1)

else:

wiringpi.digitalWrite(68, 0)


if not wiringpi.digitalRead(77):

wiringpi.digitalWrite(69, 1)

else:

wiringpi.digitalWrite(69, 0)


if not wiringpi.digitalRead(78):

wiringpi.digitalWrite(70, 1)

else:

wiringpi.digitalWrite(70, 0)


if not wiringpi.digitalRead(79):

wiringpi.digitalWrite(71, 1)

else:

wiringpi.digitalWrite(71, 0)


if not wiringpi.digitalRead(80):

wiringpi.digitalWrite(72, 1)

else:

wiringpi.digitalWrite(72, 0)

sleep(0.05)

except:

wiringpi.digitalWrite(65, 0) # sets GPA1 as 0 (0V, off)

wiringpi.pinMode(65, 0)      # sets GPA1 as input

wiringpi.digitalWrite(66, 0)

wiringpi.pinMode(66, 0)

wiringpi.digitalWrite(67, 0)

wiringpi.pinMode(67, 0)

wiringpi.digitalWrite(68, 0)

wiringpi.pinMode(68, 0)

wiringpi.digitalWrite(69, 0)

wiringpi.pinMode(69, 0)

wiringpi.digitalWrite(70, 0)

wiringpi.pinMode(70, 0)

wiringpi.digitalWrite(71, 0)

wiringpi.pinMode(71, 0)

wiringpi.digitalWrite(72, 0)

wiringpi.pinMode(72, 0)

print " "

print "fine"
=========================
As we described in the introductory part of the article, this program, keeps i2c bus constantly busy, preventing any other programs to access it. To overcome this problem it is necessary to decouple the use of the bus compared to programs. One method is to write programs that engage the bus only for the time necessary to perform the required actions, and then free it to leave it accessible by other applications.
We provide an example of this solution with Listings 2 and 3 .
===================================
Listato 2
#!/usr/bin/python


# rele_set.py


import wiringpi2 as wiringpi  # importa libreria wiringpi2


from time import sleep

import sys

pin_base = 65       # sets numeration of the pins to start from 65

i2c_addr = 0x20     # address obtained with A0, A1, A2 pins to GND

try:

wiringpi.wiringPiSetup()                    # initializes wiringpi2 librery

wiringpi.mcp23017Setup(pin_base,i2c_addr)   # sets i2c pin and address

wiringpi.pinMode(65, 1)         # sets GPA0 as output

wiringpi.digitalWrite(65, 0)    # sets GPA0 to 0 (0V, off)

wiringpi.pinMode(66, 1)         # sets GPA1 as output

wiringpi.digitalWrite(66, 0)    # sets GPA1 to 0 (0V, off)

wiringpi.pinMode(67, 1)         # sets GPA2 as output

wiringpi.digitalWrite(67, 0)    # sets GPA2 to 0 (0V, off)

wiringpi.pinMode(68, 1)         # sets GPA3 as output

wiringpi.digitalWrite(68, 0)    # sets GPA3 to 0 (0V, off)

wiringpi.pinMode(69, 1)         # sets GPA4 as output

wiringpi.digitalWrite(69, 0)    # sets GPA4 to 0 (0V, off)

wiringpi.pinMode(70, 1)         # sets GPA5 as output

wiringpi.digitalWrite(70, 0)    # sets GPA5 to 0 (0V, off)

wiringpi.pinMode(71, 1)         # sets GPA6 as output

wiringpi.digitalWrite(71, 0)    # sets GPA6 to 0 (0V, off)

wiringpi.pinMode(72, 1)         # sets GPA7 as output

wiringpi.digitalWrite(72, 0)    # sets GPA7 to 0 (0V, off)

wiringpi.pinMode(73, 0)         # sets GPB0 as input

wiringpi.pullUpDnControl(73, 0) # internal pull-up and pull-down deactivated

wiringpi.pinMode(74, 0)         # sets GPB1 as input

wiringpi.pullUpDnControl(74, 0) # internal pull-up and pull-down deactivated

wiringpi.pinMode(75, 0)         # sets GPB2 as input

wiringpi.pullUpDnControl(75, 0) # internal pull-up and pull-down deactivated

wiringpi.pinMode(76, 0)         # sets GPB3 as input

wiringpi.pullUpDnControl(76, 0) # internal pull-up and pull-down deactivated

wiringpi.pinMode(77, 0)         # sets GPB4 as input

wiringpi.pullUpDnControl(77, 0) # internal pull-up and pull-down deactivated

wiringpi.pinMode(78, 0)         # sets GPB5 as input

wiringpi.pullUpDnControl(78, 0) # internal pull-up and pull-down deactivated

wiringpi.pinMode(79, 0)         # sets GPB6 as input

wiringpi.pullUpDnControl(79, 0) # internal pull-up and pull-down deactivated

wiringpi.pinMode(80, 0)         # sets GPB7 as input

wiringpi.pullUpDnControl(80, 0) # internal pull-up and pull-down deactivated


except Exception, e:

print e
===================================
Listato 3
#!/usr/bin/python


# rele_pin_set.py


import wiringpi2 as wiringpi

from time import sleep

import sys


Pin = sys.argv[1]

Stato = sys.argv[2]

pin_base = 65       # sets pin numeration to start from 65

i2c_addr = 0x20     # address obtained with pins A0, A1, A2 to GND

Pin_num = int(Pin[1:]) + 65

try:

wiringpi.wiringPiSetup()                    # initializes wiringpi  library

wiringpi.mcp23017Setup(pin_base,i2c_addr)   # sets pins and i2c address

if Stato == "ON":

wiringpi.digitalWrite(Pin_num, 1) # sets pin to 1 (3V3, on)

else:

wiringpi.digitalWrite(Pin_num, 0) # sets pin to 0 (0V, off)

except Exception, e:

print e
The solution is composed of a program, to be launched at Raspberry Pi boot to initialize the integrated MCP23017 and configure the pins in the configuration required by the shield. The second program is launched each time you want to change the state of an output pin. In our example we will launch it in defined moments using the cron scheduler. In this way we can build a timed system such as for irrigation or a lighting control system for day/night switches.
Program in Listing 2 is derived from the initial configuration of the program shown in Listing 1. Also the program presented in Listing 3 is derived from fragments of code in Listing 1 with the added ability to receive external parameters, in our case we provided for two. The name of the pin which we want to change the status, in the Ax form, and the value of the state that we want to set: “ON” or “OFF”. The format in which we will then launch the command is:
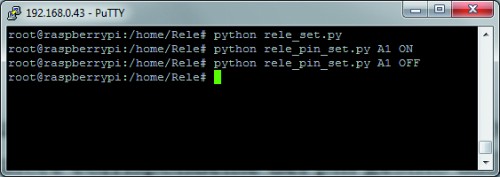
python rele_pin_set.py A1 ON
To read the parameters from inside the program we use the “argv” method of the “sys” module. In Python, the “sys” module provides a series of functions and variables that allow you to interact with the runtime environment in which the program is run. Function “argv” contains the list of arguments passed to the program at launch. The parameters are made available in an array where the element argv [0] contains the name of the program and the subsequent argv[i] contains arguments, in the order in which they were typed at the command line. In our case we have:
argv [0] = “rele_pin_set”
argv [1] = “A1”,
argv [2] = “ON”
The acquired parameters are used to customize the configuration instructions of the pin. Since we assigned to the first pin the value of 65, to obtain the correspondence between the parameter passed to the program, and the corresponding number managed by the library, we use the command:
Pin_num = int(Pin[1:]) + 65
The purpose of this instruction is to eliminate the initial “A” from the first parameter, and add 65 to the resulting numeric value to get the corresponding value of the pins managed by the
library. Let’s slaunch manually the first program to initially configure the MCP23017.
Then we can launch the second program by changing parameters and check the results we get.
We will now configure the “cron” scheduler.
The “cron” scheduler is the default Linux service for the timed execution of programs and commands.
To operate, cron is leaning on a table that contains “Directives” on programs to run and execute them in such moments. The table used by cron is managed with crontab functionality with the syntax that follows:
crontab <option> where option can have values –e, -1 amd –r.
The command:
crontab -e
allows us to open the default crontab configuration.
Each line of the configuration file has the following structure:
* * * * * command to execute
– – – – –
| | | | |
| | | | +—- weekday (0-6) (0=Sunday)
| | | +——- month (1-12)
| | +——– day (1-31)
| +———- hour (0-23)
+———— minute (0-59)
Each parameter can be configured as a set of values (eg: 0,3,7,9) as a range (eg: 3-7) or a mixture of the two, (eg: 0,3,4-6,9) or again as frequency */5 (every 5 minutes, hours, etc..). In our case, we want the same program to run every pair minutes (rele_pin_set.py) with the parameters set so as to close the relay connected to pin GPBA1 while every odd minute the same program should rerun with the parameters set to open the relay. In the window that shows the contents of the file, we can add at the bottom the lines of the directive as shown:
0-58/2 * * * * python /home/Rele/rele_pin_set.py A1 ON > /dev/null
which means: to run the program every pair minute (at every hour, day and mont).
1-59/2 * * * * python /home/Rele/rele_pin_set.py A1 OFF > /dev/null
We close the file with <CTRL> x, answering “y” when prompted to save the file and confirm the name with “Enter”. From now on, every minute the program will be launched, alternatively, activating and deactivating the relay.
To change the cron settings recall the functionality:
Crontab -e
To see the settings we use the option:
Crontab -l
while to stop the autorun we can type
crontab -r
In the store
The I/O shield for Raspberry Pi is available in our store
That’s it!







5 Comments