- How to Adjust X and Y Axis Scale in Arduino Serial Plotter (No Extra Software Needed)Posted 3 months ago
- Elettronici Entusiasti: Inspiring Makers at Maker Faire Rome 2024Posted 3 months ago
- makeITcircular 2024 content launched – Part of Maker Faire Rome 2024Posted 5 months ago
- Application For Maker Faire Rome 2024: Deadline June 20thPosted 7 months ago
- Building a 3D Digital Clock with ArduinoPosted 12 months ago
- Creating a controller for Minecraft with realistic body movements using ArduinoPosted 12 months ago
- Snowflake with ArduinoPosted 1 year ago
- Holographic Christmas TreePosted 1 year ago
- Segstick: Build Your Own Self-Balancing Vehicle in Just 2 Days with ArduinoPosted 1 year ago
- ZSWatch: An Open-Source Smartwatch Project Based on the Zephyr Operating SystemPosted 1 year ago
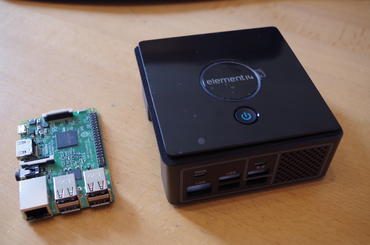
Pi Desktop Kit: Turn your Raspberry Pi into a Functional Desktop Computer

The Pi Desktop Kit is not only a nice case, it also includes an add-on board which contains a power on/off button, a Real Time Clock with battery backup, and an mSATA socket so that you can add an SSD (Solid State Disk) if you want.
There is also a software download available from the element 14 Pi Desktop page which adds the necessary functionality to the Raspbian operating system to make the On/Off switch, RTC and SSD work.
All you need to make a functional desktop system, in addition to the Pi Desktop kit, is listed below:
- Raspberry Pi Model 3 or 2 – the description and documentation don’t mention the Model B+, but I’m pretty sure it would work as well
- microSD card, loaded with Raspbian GNU/Linux
- Power Supply
- HDMI Monitor and Cable
- Keyboard and Mouse
Assembly is very easy, the Raspberry Pi can only be mounted in the box one way, or the external ports don’t line up. The add-on board goes on top of the Pi, and likewise can only be mounted one way because of the 40-pin GPIO connector and the external connections. The Pi and the add-on board are connected via their USB ports, using an external Type A to Micro USB jumper plug.
If you use a Raspberry Pi 3 Model B for this assembly, you can then get a network connection on the built-in WiFi adapter, and you can connect a Bluetooth keyboard and mouse on the built-in Bluetooth adapter. That means the only external connections you need to the Pi Desktop are the HDMI display cable and the power supply. That makes it a very neat little package on your desk.
If you use a Raspberry Pi 2 Model B for this assembly, you will at least have to add a USB dongle (or two) for the keyboard and mouse, and either a USB WiFi dongle or a wired network cable.
The top of the Pi Desktop enclosure has a blue LED ring which gives some information about the state of the system:
- glows when the Raspberry Pi is on
- dark when the Raspberry Pi is off
- blinks while the Raspberry Pi is rebooting
- blinks for 30 seconds and then does dark when the Raspberry Pi has been manually shut down from the GUI or command line, rather than by pressing the power button
If you want to use a Raspberry Pi as an everyday desktop computer, this kit in association with a Pi 3 Model B could be probably the perfect choice. Click here for further information.


