- How to Adjust X and Y Axis Scale in Arduino Serial Plotter (No Extra Software Needed)Posted 3 months ago
- Elettronici Entusiasti: Inspiring Makers at Maker Faire Rome 2024Posted 3 months ago
- makeITcircular 2024 content launched – Part of Maker Faire Rome 2024Posted 5 months ago
- Application For Maker Faire Rome 2024: Deadline June 20thPosted 7 months ago
- Building a 3D Digital Clock with ArduinoPosted 12 months ago
- Creating a controller for Minecraft with realistic body movements using ArduinoPosted 1 year ago
- Snowflake with ArduinoPosted 1 year ago
- Holographic Christmas TreePosted 1 year ago
- Segstick: Build Your Own Self-Balancing Vehicle in Just 2 Days with ArduinoPosted 1 year ago
- ZSWatch: An Open-Source Smartwatch Project Based on the Zephyr Operating SystemPosted 1 year ago
Wi-Lamp, the Open Source Wi-Fi LED lamp
Let’s create a multi-function LED lamp, always connected via wireless, thanks to Arietta G25.
Since several years already, it is possible to find systems for home automation: irrigation, doors and windows, lighting, air conditioning and alarm systems, everything can be centralized and planned. Recently, the classical control boxes have been replaced by smart systems that are always connected to the Wi-Fi Network and that can be remotely accessed by means of mobile devices such as smartphones or tablets.
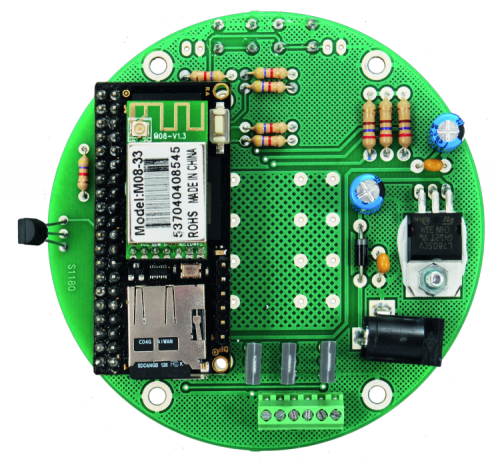
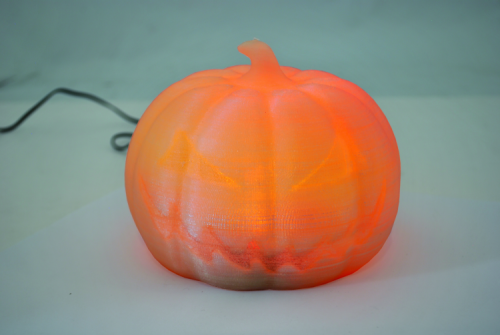
The here-proposed project follows this trend and is dedicated to the lighting, since it is a RGB lamp (thus capable of taking all the colours) and manageable by means of devices that are connected via Wi-Fi. The heart of the lamp, that we baptized Wi-Lamp, is a board having a wireless interface, and mounting a RGB power LED, and also has a terminal box that allows, as an alternative, to command RGB strips, thus allowing us to lighten whole spaces. As for the usage as a single lamp, Wi-Lamp’s circuit can be included in a commercial lamp, such as a bedside lamp, or in a shell having the desired shape, and printed via a 3D printer; concerning this, we would like to remind that by searching for “lamp” on the thingiverse website, many examples may be found.
After the assembling and the configuration, Wi-Lamp will always be connected to your Wi-Fi network, and you will be able to control it by means of a tablet or of a smartphone, or more in general via any device that is provided with a browser and connected to the same network: it will be enough to access the web control panel and to select one among the various operating modes available, that are the following ones:
- OFF = the lamp is turned off, even if the Arietta board is kept on, waiting for commands;
- Self = by scrolling the finger on the colour picker we may select the desired colour and intensity;
- Fade = the lamp will fade from a colour to another, as in an infinite cycle; by acting on the horizontal bar (slider) we may control its speed;
- Party = the lamp will flash with random colours, at a speed that can be set by means of the horizontal bar;
- Sunset = a useful mode, in the case we wanted to go to sleep without having to remember to turn off the lights; we may select the duration of the “sunset” (from 1 and up to 20 minutes) by means of the slider, and to make it start by pressing the “Sunset Start” button (the lamp will be turned on immediately with a white colour, and will fade following all the colours of the sunset, until it is completely turned off);
- Sunrise = this mode is similar to the Sunset one, but it has colours that are more suitable for the morning; by acting on the slider it is possible to select the dawn duration (from 1 and up to 20 minutes), while the “Starting Time” field is needed in order to select the starting time; once the set hour has been reached, the lamp (from being turned off) will start to gradually turn on, by showing all the dawn colours, and until a full (white coloured) light has been reached;
- Temperature = thanks to the DS18b20 sensor on the board, we may learn the room’s temperature, and colour the lamp with a hue going from blue (the minimum temperature set) to red (the maximum temperature set); as an example, by setting the minimal temperature to 10°C and the maximum one to 30°C, if the the detected temperature was around 10°C (or less), the lamp would be completely coloured in blue;
- Fire = the lamp will simulate the flame in a fireplace;
- Settings = in this section it is possible to change the modes that are recalled when pressing the two buttons that are on the lamp’s PCB; moreover it is possible to completely turn off the lamp (Arietta included) by pressing the “Shutdown Lamp” button;
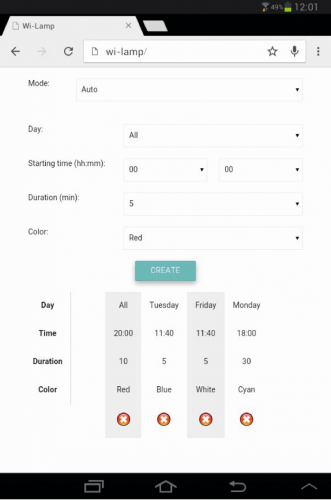
- Auto = by means of this mode, it is possible to program the lamp, so that it (or all of them) will be started on a certain day of the week, at a certain time, for the desired duration and time; after having set all the parameters, you need to press the “Create” button in order to save the planning and, in order to delete the planning, you need on the other hand to press the red round icon with an X.
The Auto mode also allows to simulate the presence of people at home, by systematically turning on and off the lights in one or more rooms: it could help preventing theft attempts. The Sunrise and Auto mode operate only if the Wi-Lamp is left in the same modes: as an example, if we wanted to wake up at 07:30 with the dawn colours, after having set duration and time, we would have to leave the lamp in Sunrise mode for the whole night.
Circuit diagram
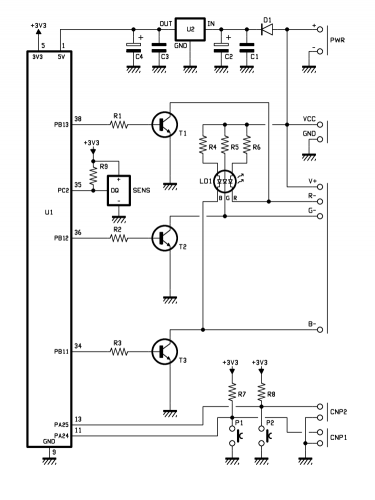
The heart of the Wi-Lamp is an Arietta G25 board (in the circuit diagram it is signed as U1): it is a very small (53x25mm) Linux embedded module, and fully manufactured in Italy: with a 400MHz processor and 128 Mb DDR2 RAM, it is capable of carrying out the task for which it has been chosen. The storage is supplied by a SD card (4Gb or more) containing the Linux distribution, while the connectivity is given by the dedicated Wi-Fi module that uses a RaLink RT5370N chip. In addition to Arietta, in the circuit diagram it is possible to find a power supply section, depending on U2, that allows to obtain the 5V with which Arietta is powered, by starting from the voltage applied by means of the PWR plug or of the specific terminal box.
The RGB power LED is commanded by means of PWM voltages, via Arietta’s 34, 36, 38 pins, whose signals are amplified by the T1, T2, and T3 BD139 transistors, whose collector is then brought on the terminal box as well, so to connect possible LED strips. The buttons are connected by means of the pull-up resistors, R7 and R8, to Arietta’s pins 11 and 12, while the DS18B20 temperature sensor is connected to pin 35.
Installation and configuration
In order to prepare Arietta’s SD card we may download either the Linux image that is ready from our repository website, or the last available image for Arietta, from the “Download” section at the acmesystems website (the file is “arietta_with_wifi.img.zip”). In both cases we have to write the image on the SD card, by means of the Win32DiskImager software, that may be freely acquired at the following address: sourceforge.net/projects/win32diskimager/.
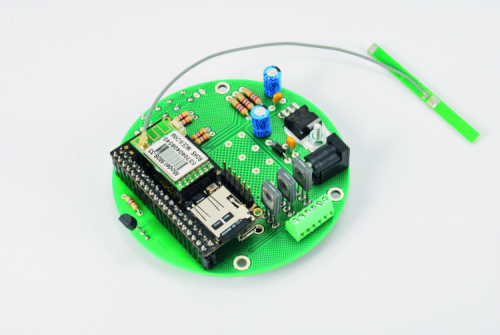
Once the SD Card has been prepared, we will insert it in Arietta, and then mount the Wi-Fi module (including the antenna) and connect our PC by means of a micro USB cable.
During the first connection, if the drivers installation reached a successful conclusion, in the Device Manager (found from Windows Vista onwards…) on our computer, the “USB Ethernet/RNDIS Gadget” device will be displayed in the “Network adapters” section; in the case our computer does not recognize Arietta, we will have to click – with the right button – on the “unknown device” icon, and then select “Driver software update…”, then “Browse my computer for the driver software” and then “Let me pick from a list of device drivers on my computer”. Let’s scroll the list on the left, until we find (and select) the “Microsoft Corporation” or “Microsoft Corp.” entry; from the list on the right let’s select the “Remote NDIS based Internet Sharing Device” and complete the installation by clicking on “Next”: after a few moments the device should appear in the “Network adapters” section.
After having shared our LAN with Arietta via PC, we have to share the Internet connection; for the purpose let’s move in the Control Panel, and select “Network and Internet”, then “Network and Sharing Center” and then click on the entry on the left, “Change adapter settings”. In the window that will open, you will find (among the various icons) the one concerning the Internet connection and the one regarding Arietta (that could be named as “Local Area Connection 2”): let’s click with the right button on the Internet connection, and select “Properties” and click on the “Sharing” board; let’s check then “Allow other network users to connect through this computer’s Internet Connection” and in the “Home Network Connection” box let’s select Arietta’s connection.
Let’s confirm with a click on the “OK” button (even for the following requests): in this way Arietta will be able to connect to Internet via the home network. Now let’s click with the right mouse button on Arietta’s network connection, and select the “Properties” entry. Let’s scroll the list of the elements until we find the “Internet Protocol version 4 (TCP/IPv4)”, and select and click on the “Properties” button: in the form that will appear, we will have to click on “Use the following IP address” and type 192.168.10.20 in the “IP address” field, and 255.255.255.0 in the “Subnet mask” field. We will then have to confirm via the “OK” button and to close Arietta’s connection window.
If you wish to examine in depth the connection between Arietta and the PC, please visit the following web page.
As regards the sharing of the Internet connection with the USB peripherals, you will find a detailed guide.
Now we may connect to Arietta in SSH, via PuTTY: let’s open the program and type in 192.168.10.10 as an IP address. Let’s launch the connection and connect as a “root” user, using the “acmesystems” password; in the case we had chosen the ready-to-use Wi-Lamp image, we will have to type in the data of our Wi-Fi connection, in order to have Arietta to connect directly, when it will be mounted on the lamp’s PCB.
If we have a Wi-Fi connection with a WPA protection available (which is true in most cases), let’s edit the configuration file by means of the following command: nano /etc/wpa_supplicant.conf. Let’s type in name and password for our network in the corresponding spaces, and then close and save the file, by means of CTRL+X, Y and RETURN. If, on the other hand, we have a Wi-Fi connection with a WEP protection, we will have to open the network interfaces file by means of the following command: nano /etc/network/interfaces. Let’s comment the following lines by using the hash (#) at the beginning of the line:
wireless-essid any
pre-up wpa_supplicant -i wlan1 -c /etc/wpa_supplicant.conf -B
post-down killall -q wpa_supplicant
Let’s remove the hash (#) from the following lines:
wireless-essid WiFi_Name
wireless-mode managed
wireless-key s: WiFi_Password
Let’s type in the data of our Wi-Fi network in the place of “WiFi_Name” and “WiFi_Password”, and then close and save the file by means of CTRL+X, Y and RETURN. In both cases we have to comment the gateway 192.168.10.20 line, contained within the /etc/network/interfaces file; weren’t it commented, Wi-Lamp would not be able to connect to the Internet by means of out Wi-Fi network, so to synchronize the system clock. With the said line commented, we will no longer be able to reach Arietta via the USB connection, but only by means of the Wi-Fi connection.
Let’s launch the following command, so to activate Arietta’s Wi-Fi connection: ifdown wlan1 && ifup wlan1. After a few moments, we will be able to verify the effective connection, and to find our lamp’s IP, via the command (let’s read the “wlan1” line, parameter “inet addr”):
ifconfig. If everything reached a successful conclusion, and Arietta connected to our Wi-Fi network, we will turn it off by means of the shutdown -h now command. In the case we had chosen to download the image to be prepared from the ACME Systems’ website, after the connection as “root” via PuTTY, we will move to the acme user home by means of the cd /home/acme command.
Let’s remove the certificates’ verification, so to be able to download the repository, by means of the following command: git config –global http.sslverify false
We will then download the files needed for the installation and the functioning of Wi-Lamp from GitHub, by means of the following command: git clone https://github.com/open-electronics/wi-lamp.git. Let’s move now in the setup folder by means of the cd wi-lamp/utils command, and launch WI-Lamp’s installation by means of the
bash setup.sh WiFi_Name WiFi_Password [WPA/WEP] command, and making sure to substitute “WiFi_Name” and “WiFi_Password” with the data of our Wi-Fi network, while with the last parameter we will indicate WPA if we have a Wi-Fi network with such a kind of protection, otherwise we will indicate WEP. As an example, the command to launch the setup could be:
bash setup.sh MiaRete MiaPassword WPA. After having pressed the RETURN button, the installation procedure will start: it will last around 40 minutes, and will use your PC’s Internet connection that is shared with Arietta via USB. The setup.sh file deals with carrying out the update and the Linux distribution’s upgrade, so to manage: to update all the packages, to copy the Arietta pins’ configuration file in the boot, to install NTP in order to synchronize Arietta’s time with the Internet, to install the Python’s libraries needed to use Arietta’s configurable pins, to change the system’s hostname in order to reach the lamp (by typing in http://wi-lamp from the browser), to copy all the web control panel files under /var/www (thus making a backup of the preexisting files), and finally to configure the Wi-Fi network with the parameters we initially gave to it (network’s name, password and kind of protection). At the end of the setup, a paragraph will appear on the terminal, starting with “Setup is finished, Arietta will now shutdown.” The IP with which to reach the lamp will be indicated, should the http://wi-lamp address appear not be working, because of restrictions on the home router. Whatever button will turn Arietta off.
Testing
Once powered, the lamp will be coloured white for a few seconds, only to turn off: from that moment on we will be able to reach it from any device, by means of its name, or IP address (that we obtained during the configuration stage). If we wanted to turn the lamp completely off, after having used the “Shutdown Lamp” button, we will have to wait for some moments, before disconnecting the power supply (the lamp will be coloured with a fixed white light).
Wi-Lamp’s source code is thus organized:
- common/: a folder with the Javascript libraries commonly used, CSS and pictures for the web control panel;
- engine/: a folder containing the lamp.py and buttons.py files, that are executed at each time Arietta is booted; the first one manages all the lamp modes, while the second one detects the pressure of one of the two PCB buttons, and changes the lamp mode; lampio.py manages the reading and the writing of the text files and is recalled by the first ones, while setled.sh deals with effectively colouring the RGB LED;
- storage/: this folder contains the text files containing the modes’ settings:
– auto: contains all the schedulings for the automatic ignition of the lamp, in rows, in the day/hh:mm/duration/R,G,B format;
– buttons: contains the two modes, divided by the comma, and that can be recalled by the two PCB buttons;
– color: contains the colour that the lamp will take in Self mode, in R,G,B format;
– mode: contains the current lamp mode, the modes start from number zero (OFF) and are numbered, in sequence;
– shutdown: contains 1, if we have pressed the “Shutdown Lamp” button, otherwise it contains 0;
– speed: contains the values from 0 to 4, in order to regulate the speed, both in Fade and in Party mode;
– sunrise_duration: contains the dawn duration, in minutes (from 1 to 20);
– sunrise_time: contains the time and the dawn starting minutes, expressed in hh:mm format;
– sunset_duration: contains the duration of the sunset, in minutes (from 1 to 20);
– sunset_start: contains 1 if we pressed the button so to start the sunset, otherwise it contains 0;
– temperature: contains the maximum and minimum temperature values, as set in the Temperature mode, divided by the comma;
– temperature_sensor: at each start it is populated by the temperature sensor’s name that is detected by Arietta;
- utils/: this folder contains the configuration file for Arietta’s pins, that is copied during the installation stage in the /boot directory, the setup.sh file that prepares Arietta for Wi-Lamp and installs all the components, and the startup.sh file, that is executed each time Arietta is started, by launching the lamp.py and buttons.py files;
- index.php; it is Wi-Lamp’s web control panel;
- wi-lamp.php: it deals with receiving asynchronous commands from index.php and with the populating of all the files in the storage/ folder.
The lamp.py file may thus be considered as the main Wi-Lamp’s script: at each second it checks if the mode has changed, while every 0.15 seconds it extracts the data concerning the current mode; if we were in the Fade mode the speed file would be read, so to control the fading speed. Now, let’s deepen our knowledge of some aspects concerning the modes: OFF simply sets the R, G and B to zero every 0.8 seconds, so to keep the lamp turned off. Self continuously reads the color file, and every 0.2 seconds, it sets the value read at the LED. Each time the Fade mode is recalled, it moves the current hue one step forward, by lowering a colour and raising the following one: in fact, it begins from a starting situation such as 255, 0, 0 (red) so to slowly fade to 0, 255, 0 (green) and to finish the round with 0, 0, 255 (blue); the speed with which this function is recalled depends on the value contained in the speed file. The Party mode randomizes the three LED colours and sets them with a time interval depending on the value contained in the speed file. Sunset essentially executes three operations, one excluding the other ones: if the sunset start button has been pressed (thus reading from the sunset_start file), it sets the lamp in “busy” mode, if the lamp is in “busy” mode and the sunset duration has passed (the minutes may be set from the web control panel, and are read from the sunset_duration file), it frees the lamp and sets it to OFF; while if the lamp is “busy” and the minutes of the sunset duration have not passed yet, it deals with running the hue that from the white goes through all the sunset colours, until it is completely turned off. The Sunrise mode is very similar to the Sunset one, with the difference that the dawn animation starts when reaching the time set from the control panel (sunrise_time file) and the lamp, from being turned off, goes through all the hues that are typical of the sunrise colours, until it is completely white lighted; even here there is a duration (in minutes) that can be set (sunrise_duration file). The Temperature mode reads the temperature (as measured by the sensor) every 0.8 seconds, and sets the lamp of the colour obtained from the blue-red hue and from the minimal and maximum temperature values, as previously set on the temperature file. The Fire mode randomizes a colour from the red-yellow hue, every 0.1 seconds: it is not possible to set the speed for this animation. The Auto mode (named Automatic in the source code) extracts the list of the lamp start schedulings from the auto file, and every 0.8 seconds; it analyzes them, one by one, so to understand if the day and the starting time correspond to the current ones and, being the case, it sets the lamp in busy mode, for the duration set in the scheduling, by colouring the LED with the preset colour; in the end it turns off the LED and “frees” the lamp, that goes back to be ready for another automatic ignition.
From openstore
ARIETTA-G25 : ARM9 Linux Embedded Module (128MB)
OEM WiFi module with external antenna





Pingback: Wi-Lamp, the Open Source Wi-Fi LED lamp - Electronics-Lab